Users can email files directly into a folder in Projectfusion.
Once set up, this will allow users to upload files directly into folders in the document library without the need to log in.
Note: When uploading files via email it is important to either leave the ‘subject’ field blank OR have a subject, but do not include a space at the end of the subject and also to ensure there is some text in the message body to make sure the file is uploaded correctly. You will also be unable to upload a file with the same name as a file already in the destination folder.
We suggest uploading files to a preparation or test site first and then moving them into the live environment when ready.
How to set up ‘Email Upload’ on a folder in your site.
1. Ask an admin user (or just get in touch with us) to add your user account into the ‘EMAIL_CONTRIBUTORS’ group.
2. As a site manager, navigate to the document library and create a folder (or select an existing folder). This will be the folder that files will be emailed in to.
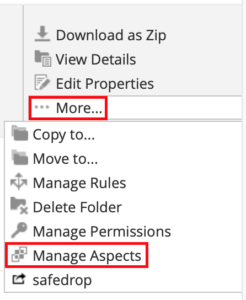
3. Hover your mouse above the folder in the document library and click ‘More’ from the options on the right side, then click ‘Manage Aspects’.


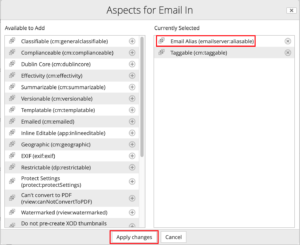
4. Select the ‘Email Alias’ (emailserver:aliasable) aspect in the list by clicking on the + symbol to it’s right side and then click ‘Apply Changes’ to add it to the folder.


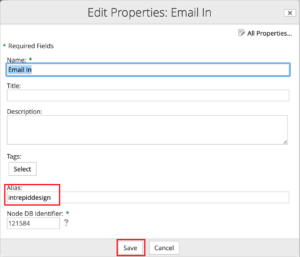
5. Hover your mouse above the folder again in the document library and this time click ‘Edit Properties’ and set the ‘Alias’ of the folder – this will be the word at the beginning of your ‘email in’ address.


e.g. If the alias is set to ‘test’, then the ‘email in’ address will be ‘test@YOURSERVER.projectfusion.com’
(Do not edit the node db identifier number)
Once this has been set up correctly, you will be able to upload files via email. Note that only email addresses belonging to users added to the ‘EMAIL_CONTRIBUTORS’ group will be able to email files to your Projectfusion service.
How to allow email uploads from any email address.
This will need to be allowed by an admin user.
If you would like to enable this for your site, please contact support@projectfusion.com.
How to Upload files via email.
When you want to upload files via email, you should address your email to ‘ALIAS@YOURSERVICE.projectfusion.com’ with ‘ALIAS’ being replaced with the alias you set in the target folder and ‘YOURSERVICE’ being replaced with the corresponding text in the web address of your data room.
e.g. if your data room web address was https://d456.projectfusion.com and the ‘Alias’ in the folder properties was set to ‘apple‘ then the address you would send your files to would be…
‘apple@d456.projectfusion.com’
1. Your email’s subject will be the name of the folder that appears in the document library.
2. ‘Created by’ will only display your username if you have a user account on the system linked to your email address. For everyone else sending files in without a user account on the system, this will say ‘Created by Mailin User’.
3. ‘To:’ shows the email address of that folder, this is the address you send the files to to have them uploaded. The Alias in this case was ‘examplealias’ and the server address was d999.projectfusion.com.
4. The email message body text will also be displayed in the description of the folder.
The files you attached to your email will be stored in site this folder until you copy or move the files out.
For any questions, issues or if you just need some help, please email support@projectfusion.com
Reminder: Make sure that you also include some text in the message body – with no text in the message body, one of the attached files will become unreadable. Also, either leave the subject blank, or include a subject without a space at the end.
Allowed Subject: ‘Documents for mail in’
Not allowed: ‘Documents for mail in ‘ (Note the space at the end)


