There are multiple ways in which to upload and download to and from Projectfusion this article will explain all of them for you.
Upload Limit
LARGE!
The limits are 2Gb for each of the upload methods below:
- Browser upload
- Drag and drop
- Using WebDAV (tools like GoodSync etc)
Uploading
1 – Drag & Drop
This is the easiest way to upload.
- Go to the Document Library.
- Now from your local computer drag 1 or more files or folders onto the screen, and drop them to begin the upload.
- Click OK to complete the upload.
*When dragging and dropping folders, any subfolders and files within will also be uploaded and the folder structure will be maintained in the document library.
If the name of your folder or file contains any of the following characters, the upload will fail.
? ” * < > ? / : |
2 – Upload Button
This method is designed for when drag and drop are not supported.
- Go to the Document Library.
- Click the “Upload” button near the top of the screen.
- Click the magnifying glass icon and select a file from your local computer.
- When ready click Upload to start uploading the file.
- When complete click OK to finish.
- Repeat step 2 for other files.
3 – GoodSync (Bulk Uploading)
You can use 3rd party tools like Goodsync to automatically copy folders from your PC or network drive.
Uploading files places high loads on the server. To minimise any server slowdown, we suggest you run no more than 2 concurrent upload threads, and limit uploads to 100 kilobytes/sec (approx 0.75Mb)
Daily all day uploads? Ask us to quote for a dedicated upload server.
To set it up:
Get a copy of Goodsync there are two versions available the first is free and limits you to 3 Jobs and 100 Files, the second is paid and is completely unlimited this costs $30 and is for 5 devices.
Before setting up the GoodSync application create a brand new “Contributor” user to upload documents. Avoid using a Manager to reduce the risk of accidental deletions!
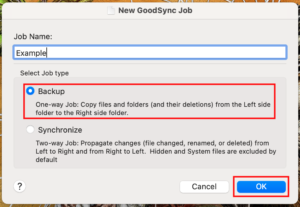
To start a new job, press ‘Create a New Job’ at the bottom of the window.
Once the ‘New GoodSync Job’ window is open, enter your desired job name and select ‘Backup’ as your job type. We recommend you use ‘Backup‘ mode at all times!
Now you need to tell Goodsync which folder on your PC and which folder on PROJECTFUSION to connect to.
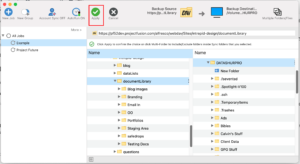
Click the left folder button from the right hand side of the top menu bar. This opens the Left Folder window, where you can choose your upload source. Navigate through your local machine or network to tell GoodSync where you want to upload files from. The screenshot below show the ‘Desktop’ folder selected.
This tutorial assumes you are using goodsync to UPLOAD content. For download/backups the left hand side needs to be the Dataroom/Webdav connection – ask us for help setting up.

Next, click the right folder button from the right hand side of the top menu bar. This opens the Right Folder window, where you can choose your upload destination.
Scroll down the list to find WebDAV and click the ‘add user’ icon to the right side of the list. This will open the new WebDAV account pop up window.
Now enter the Server Address* and WebDAV root (see example below) and your usual account username and password. Make sure you type https (note the S) and tick “Secure Mode” under the Advanced Options (click the arrow to drop the menu down).
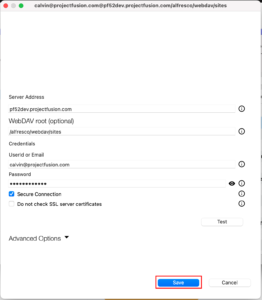
The address must look like this
*Address – https://YOURROOM.projectfusion.com (make sure you type this exactly and replace the YOURROOM with the correct name)
The WebDAV root is not optional and MUST be the following – /alfresco/webdav
IMPORTANT! — For downloads we strongly recommend you use the new “Consumer” user as they don’t have permission to write or delete files. Ask if unsure!
After entering the username, password and address click Save to save your WebDav details.
Goodsync will now try to connect to the data room using the details you entered. If you have token authentication on your user account, you’ll need to login to the web interface before goodsync will connect.
After connecting you’ll see a panel of folders appear below, simply click into the “Sites” folder, then again into the appropriate site, and finally single left click the “documentLibrary” folder to select it as the download source. If you wish to download from a specific folder drill down further and highlight that instead of the documentLibrary.
With both the left and right folders both selected, click the green ‘Apply’ button at the top to save the configuration.
*** CRITICAL STEP ***
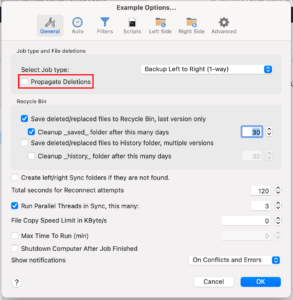
We need to turn off Propagate Deletions and stop it storing a system file on the left and right sides. See steps below.
Click Options from the top right corner of the Goodsync window to open the Options pop up.
Under the tab called “General”, you will need to UNCHECK the box named “Propagate Deletions” as outlined in red in the image below. Also make sure the backup is still from left to right.
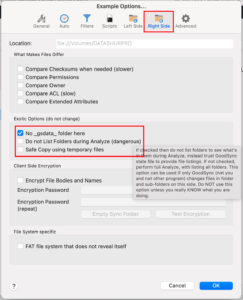
Then, in BOTH the “Left Side” and “Right Side” tabs, UNCHECK the “Safe Copy using temporary files” box and CHECK the “No _gsdata_ folder here” box as outlined in red in the image below. When you have done all this, click the “OK” button in the bottom right of the window.

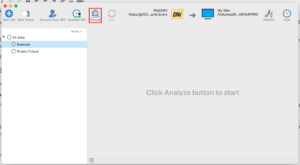
That’s it. Whenever you want goodsync to synchronise the folders, press Analyse, then press Sync to upload.
You will almost certainly find that some files do not copy up, goodsync will tell you which ones. This is usually because they’re too large, or have characters our service cannot use.
Downloading
You can use 3rd party tools like Goodsync to copy data from a Projectfusion data room.
A note of caution:
Using sync software like GoodSync is dangerous – a misconfiguration could delete your data.
To download data safely we highly recommend you set up and use a “Consumer” (download only) account.
Setup Guide
Firstly, download the latest copy of Goodsync (there is a trial available) and install and open it.
To start a new job, press ‘Create a New Job’ at the bottom of the window.
Once the ‘New GoodSync Job’ window is open, enter your desired job name and select ‘Backup’ as your job type. We recommend you use the ‘Backup‘ mode at all times!
(Now you need to tell Goodsync which folder on your PC and which folder on PROJECTFUSION to connect to.)
Click the left folder on the top bar (#1 in the screenshot) then scroll down the list and find WebDAV and click the ‘add user’ icon to the right side of the list.
Now enter the Server Address* and WebDAV root (see example below) and your usual account username and password. Make sure you type HTTPS (note the S) and tick “Secure Mode” under the Advanced Options (click the arrow to drop the menu down).
The address must look like this
*Address – https://YOURROOM.projectfusion.com (make sure you type this exactly and replace the YOUR ROOM with the correct name)
The WebDAV root is not optional and MUST be the following – /alfresco/WebDAV
IMPORTANT! — For downloads, we strongly recommend you use the new “Consumer” user as they don’t have permission to write or delete files. Ask if unsure!
After entering the username, password and address click Save to save your WebDav details.
Goodsync will now try to connect to the data room using the details you entered. If you have token authentication on your user account, you’ll need to login to the web interface before GoodSync will connect.
After connecting you’ll see a panel of folders appear below, simply click into the “Sites” folder, then again into the appropriate site, and finally single left-click the “documentLibrary” folder to select it as the download source. If you wish to download from a specific folder drill down further and highlight that instead of the documentLibrary.
Next, click the right folder button from the right-hand side of the top menu bar. This opens the Right Folder window, where you can choose your download destination. Navigate through your local machine or network to tell GoodSync where you want to download files to.
With both the left and right folders both selected, click the green ‘Apply’ button at the top to save the configuration.
One last step. We need to turn off Propagate Deletions and stop it storing a system file on the left and right sides. See the steps below.
Click Options from the top right corner of the Goodsync window to open the Options pop up.
Under the tab called “General”, you will need to UNCHECK the box named “Propagate Deletions” as outlined in red in the image below. Also, make sure the backup is still from left to right.
Then, in BOTH the “Left Side” and “Right Side” tabs, UNCHECK the “Safe Copy using temporary files” box and CHECK the “No _gsdata_ folder here” box as outlined in red in the image below. When you have done all this, click the “OK” button in the bottom right of the window.
That’s it. Whenever you want GoodSync to synchronise the folders, press Analyse, then press Sync to download.
If you need any further assistance, please get in touch with our support team.