Menu
  • About Us
  • Pricing
  • Features
SCHEDULE DEMO
Popular Search goodsyncdownload

Advanced Options

  • How To Live Edit A Spreadsheet
  • How To Live Edit A PowerPoint Document
  • Real-Time Collaboration Guide
  • How To Live Edit A Document
  • Using The Projectfusion IOS App
  • Getting Your Data Room Ready For The IOS App
  • Allowing Download Access To Files
  • Projectfusion Closing Bibles
  • Backup And Redundancy Options
  • Archiving Sites The Right Way
  • Getting A Closing Bible Or Archive Of Content
  • Making Changes To Your Billing Account Such As Changing Payment Details, Billing Address, Changing Your VAT Number, Changing Your Billing Account Password Or Cancelling A Subscription
  • Adding Another Credit Card Or Direct Debit Subscription To Your Plan
  • Setting Folder And File Permissions
  • How To Setup And Use Email Upload
  • How To Upload Files Discretely
  • Uploading Or Downloading Files With Windows Web Folders / WebDAV
  • Setting Up Expandrive/Projectfusion Desktop App
  • Uploading & Downloading Files And Folders Using A Zip File
  • How To Access And View Site Reports Using The Reporting Tool
  • Projectfusion Guide To Workflows And Tasks
  • How Do I Create And Use Workflows
  • Site Index Setup And Use
  • Data Lists
  • Bulk Add Users
  • Accepting Invites And Resetting Passwords – Managers & Admins
  • Naming Conventions And Allowed Characters
  • How To Enable Advanced Excel Viewer In Your Site
  • How To Stop All Users Downloading Files
  • How To Add An Image To The Site Dashboard
  • How To Disable Sites (Managers Only)
  • Site Creators Guide
  • How To – Deleting A Site
  • Adding Custom Watermarks To Documents
  • Setting Up Watermarks
  • Setting Up Terms And Conditions
  • Create A Site And Choose Visibility / Social Settings
  • How To Add Users Into A Site Using The Groups Interface (Admin Only)
  • How To Add Yourself Into A Site & Become A Site Manager
  • Trusted Users – For Admins Only
  • Accessing Custom Reports
  • The Audit Dashlet (Administrators)
  • How Do I Customise My Data Room Emails
  • Setting Up A Custom URL With Projectfusion
  • IE6 SSL Protocols / “POODLE” Vulnerability
  • Setting Minimum Password Strength
  • Restricting Projectfusion’s Access To Your Data Room
  • Creating And Adding Users To SITE_CREATORS Groups
  • The “ADMINISTRATORS” Group And How To Add Users To It.
  • CMIS & WebDAV Control Panel
  • Disable Customize User Dashboard
  • Document Comparison
  • How To Send A File Or Folder From Your Document Library Using Safedrop
  • How To Disable Activity Feed On A Per Site Basis
  • How To Disable Recent Activity Emails
  • Getting Changes Made To Projectfusion
  • Open Standards Support
  • Using Mobile Devices With Projectfusion
  • Excel Documents In Previewer
  • How To – Use Tags
  • How To – Upload & Download
  • How to add a video to your site dashboard
  • How to use image previewer
  • How to use Blogs
  • How To – Upload Using iOS App

Safedrop

  • Safedrop Outlook Plugin Guide
  • How To – Use Safedrop Inbox
  • Using Inbox To Receive Files
  • Upload Files That Won’t Expire So You Can Safedrop Them Over And Over Again. ‘Advanced’ Interface Guide
  • Safedrop Admin
  • Safedrop Service Guide
  • Free User Safedrop Service Guide
  • How To Use The Zylpha Safedrop App
  • How To Edit Terms Of Use, Audit Retention And ‘Remember Me’ Times And Change Your API Target Folder (Advanced)
  • How To Receive Your Safedrop
  • How To Access Safedrop From Projectfusion
  • How To – Send a Safedrop
  • How To – Track a Safedrop
  • How to – Use ESIG
  • Safedrop Reminders

Getting Started

  • Getting Started With The iOS App
  • How To – Access And Manage Q&A
  • How To – Add Users
  • Getting Started Video
  • Service Guide For Managers & Admins
  • Quick Start Manual
  • How to – Use ESIG

FAQ

  • Live-Edit Keyboard Shortcuts
  • Our Policy For Upgrading/Downgrading Plans
  • Per Site Billing Option
  • What Are – Roles And Permissions
  • What Is – Autonumbering And Indexing
  • How To – Send an email to entire data room
  • Re-Inviting Members Who Have Left A Site
  • Supported Document Types For Secureview And Preview
  • How To Customise Your Site Dashboard
  • Sites I Manage
  • How To – Search
  • The Site Activity Dashlet
  • 2FA Guide
  • Deleting & Restoring Things From The Recycle Bin
  • Changing The Logo And Theme For All Sites
  • How To – Select / Change Your Home Page
  • Supported Languages
  • How To – Login To The Data Room
  • How To – Delete Files
  • How To – Branding
  • Can I transfer folders between two sites
  • Issues accessing safedrop on Chromium Browsers
  • Q&A Notifications & FAQs
  • Home
  • help
  • Advanced Options
  • How To Setup And Use Email Upload

How To Setup And Use Email Upload

Users can email files directly into a folder in Projectfusion.

Once set up, this will allow users to upload files directly into folders in the document library without the need to log in.

Note: When uploading files via email it is important to  either leave the ‘subject’ field blank OR have a subject, but do not include a space at the end of the subject and also to ensure there is some text in the message body to make sure the file is uploaded correctly.  You will also be unable to upload a file with the same name as a file already in the destination folder.

We suggest uploading files to a preparation or test site first and then moving them into the live environment when ready.


How to set up ‘Email Upload’ on a folder in your site.

1. Ask an admin user (or just get in touch with us) to add your user account into the ‘EMAIL_CONTRIBUTORS’ group.

2. As a site manager, navigate to the document library and create a folder (or select an existing folder). This will be the folder that files will be emailed in to.

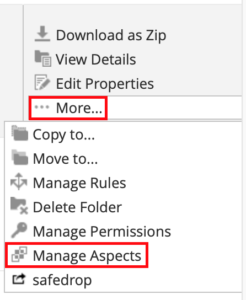
3. Hover your mouse above the folder in the document library and click ‘More’ from the options on the right side, then click ‘Manage Aspects’.

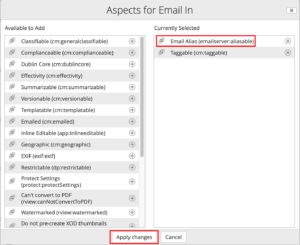
4. Select the ‘Email Alias’ (emailserver:aliasable) aspect in the list by clicking on the + symbol to it’s right side and then click ‘Apply Changes’ to add it to the folder. 

5. Hover your mouse above the folder again in the document library and this time click ‘Edit Properties’ and set the ‘Alias’ of the folder – this will be the word at the beginning of your ‘email in’ address.

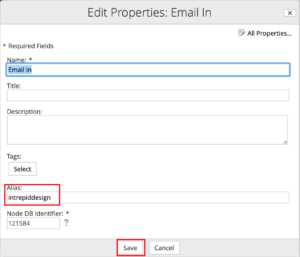
e.g. If the alias is set to ‘test’, then the ‘email in’ address will be ‘test@YOURSERVER.projectfusion.com’    

(Do not edit the node db identifier number)

Once this has been set up correctly, you will be able to upload files via email. Note that only email addresses belonging to users added to the ‘EMAIL_CONTRIBUTORS’ group will be able to email files to your Projectfusion service. 

How to allow email uploads from any email address. 

This will need to be allowed by an admin user. 

If you would like to enable this for your site, please contact support@projectfusion.com.

How to Upload files via email.

When you want to upload files via email, you should address your email to ‘ALIAS@YOURSERVICE.projectfusion.com’ with ‘ALIAS’ being replaced with the alias you set in the target folder and ‘YOURSERVICE’ being replaced with the corresponding text in the web address of your data room. 

e.g. if your data room web address was https://d456.projectfusion.com and the ‘Alias’ in the folder properties was set to ‘apple‘ then the address you would send your files to would be… 

‘apple@d456.projectfusion.com’

1. Your email’s subject will be the name of the folder that appears in the document library.

2. ‘Created by’ will only display your username if you have a user account on the system linked to your email address. For everyone else sending files in without a user account on the system, this will say ‘Created by Mailin User’.

3. ‘To:’ shows the email address of that folder, this is the address you send the files to to have them uploaded. The Alias in this case was ‘examplealias’ and the server address was d999.projectfusion.com.

4. The email message body text will also be displayed in the description of the folder.

The files you attached to your email will be stored in site this folder until you copy or move the files out.


For any questions, issues or if you just need some help, please email support@projectfusion.com


Reminder: Make sure that you also include some text in the message body – with no text in the message body, one of the attached files will become unreadable. Also, either leave the subject blank, or include a subject without a space at the end.

Allowed Subject: ‘Documents for mail in’

Not allowed: ‘Documents for mail in ‘ (Note the space at the end)

What are your Feelings
Share This Article :
  • Facebook
  • Twitter
  • LinkedIn
  • Pinterest
Updated on May 16, 2022
Setting Folder And File PermissionsHow To Upload Files Discretely
Solutions
  • Data Room
  • Collaborate Portal
  • Digital Courtroom
Resources
  • Videos
  • Downloads
  • Apps
  • Customers
Company
  • Blog
  • Contact
  • Ethics
  • (+44)20 7183 1245
We’re ISO27001 accredited…
We’re also fully GDPR compliant…
We’re also Cyber Essentials certified too!
We give 1% of turnover to charity!
Leave us a review!
  • 2021 OD Consultancy Ltd. All rights reserved
  • Terms
  • Privacy
  • sales@projectfusion.com
  • Projectfusion.com
Twitter
Facebook-square
Linkedin