Menu
  • About Us
  • Pricing
  • Features
SCHEDULE DEMO
Popular Search goodsyncdownload

Advanced Options

  • How To Live Edit A Spreadsheet
  • How To Live Edit A PowerPoint Document
  • Real-Time Collaboration Guide
  • How To Live Edit A Document
  • Using The Projectfusion IOS App
  • Getting Your Data Room Ready For The IOS App
  • Allowing Download Access To Files
  • Projectfusion Closing Bibles
  • Backup And Redundancy Options
  • Archiving Sites The Right Way
  • Getting A Closing Bible Or Archive Of Content
  • Making Changes To Your Billing Account Such As Changing Payment Details, Billing Address, Changing Your VAT Number, Changing Your Billing Account Password Or Cancelling A Subscription
  • Adding Another Credit Card Or Direct Debit Subscription To Your Plan
  • Setting Folder And File Permissions
  • How To Setup And Use Email Upload
  • How To Upload Files Discretely
  • Uploading Or Downloading Files With Windows Web Folders / WebDAV
  • Setting Up Expandrive/Projectfusion Desktop App
  • Uploading & Downloading Files And Folders Using A Zip File
  • How To Access And View Site Reports Using The Reporting Tool
  • Projectfusion Guide To Workflows And Tasks
  • How Do I Create And Use Workflows
  • Site Index Setup And Use
  • Data Lists
  • Bulk Add Users
  • Accepting Invites And Resetting Passwords – Managers & Admins
  • Naming Conventions And Allowed Characters
  • How To Enable Advanced Excel Viewer In Your Site
  • How To Stop All Users Downloading Files
  • How To Add An Image To The Site Dashboard
  • How To Disable Sites (Managers Only)
  • Site Creators Guide
  • How To – Deleting A Site
  • Adding Custom Watermarks To Documents
  • Setting Up Watermarks
  • Setting Up Terms And Conditions
  • Create A Site And Choose Visibility / Social Settings
  • How To Add Users Into A Site Using The Groups Interface (Admin Only)
  • How To Add Yourself Into A Site & Become A Site Manager
  • Trusted Users – For Admins Only
  • Accessing Custom Reports
  • The Audit Dashlet (Administrators)
  • How Do I Customise My Data Room Emails
  • Setting Up A Custom URL With Projectfusion
  • IE6 SSL Protocols / “POODLE” Vulnerability
  • Setting Minimum Password Strength
  • Restricting Projectfusion’s Access To Your Data Room
  • Creating And Adding Users To SITE_CREATORS Groups
  • The “ADMINISTRATORS” Group And How To Add Users To It.
  • CMIS & WebDAV Control Panel
  • Disable Customize User Dashboard
  • Document Comparison
  • How To Send A File Or Folder From Your Document Library Using Safedrop
  • How To Disable Activity Feed On A Per Site Basis
  • How To Disable Recent Activity Emails
  • Getting Changes Made To Projectfusion
  • Open Standards Support
  • Using Mobile Devices With Projectfusion
  • Excel Documents In Previewer
  • How To – Use Tags
  • How To – Upload & Download
  • How to add a video to your site dashboard
  • How to use image previewer
  • How to use Blogs
  • How To – Upload Using iOS App

Safedrop

  • Safedrop Outlook Plugin Guide
  • How To – Use Safedrop Inbox
  • Using Inbox To Receive Files
  • Upload Files That Won’t Expire So You Can Safedrop Them Over And Over Again. ‘Advanced’ Interface Guide
  • Safedrop Admin
  • Safedrop Service Guide
  • Free User Safedrop Service Guide
  • How To Use The Zylpha Safedrop App
  • How To Edit Terms Of Use, Audit Retention And ‘Remember Me’ Times And Change Your API Target Folder (Advanced)
  • How To Receive Your Safedrop
  • How To Access Safedrop From Projectfusion
  • How To – Send a Safedrop
  • How To – Track a Safedrop
  • How to – Use ESIG
  • Safedrop Reminders

Getting Started

  • Getting Started With The iOS App
  • How To – Access And Manage Q&A
  • How To – Add Users
  • Getting Started Video
  • Service Guide For Managers & Admins
  • Quick Start Manual
  • How to – Use ESIG

FAQ

  • Live-Edit Keyboard Shortcuts
  • Our Policy For Upgrading/Downgrading Plans
  • Per Site Billing Option
  • What Are – Roles And Permissions
  • What Is – Autonumbering And Indexing
  • How To – Send an email to entire data room
  • Re-Inviting Members Who Have Left A Site
  • Supported Document Types For Secureview And Preview
  • How To Customise Your Site Dashboard
  • Sites I Manage
  • How To – Search
  • The Site Activity Dashlet
  • 2FA Guide
  • Deleting & Restoring Things From The Recycle Bin
  • Changing The Logo And Theme For All Sites
  • How To – Select / Change Your Home Page
  • Supported Languages
  • How To – Login To The Data Room
  • How To – Delete Files
  • How To – Branding
  • Can I transfer folders between two sites
  • Issues accessing safedrop on Chromium Browsers
  • Q&A Notifications & FAQs
  • Home
  • help
  • FAQ
  • How To – Delete Files

How To – Delete Files

How to delete files from the document library

To delete files or folders from the document library, you must either have manager/collaborator permissions or you must be the file or folder owner/creator.

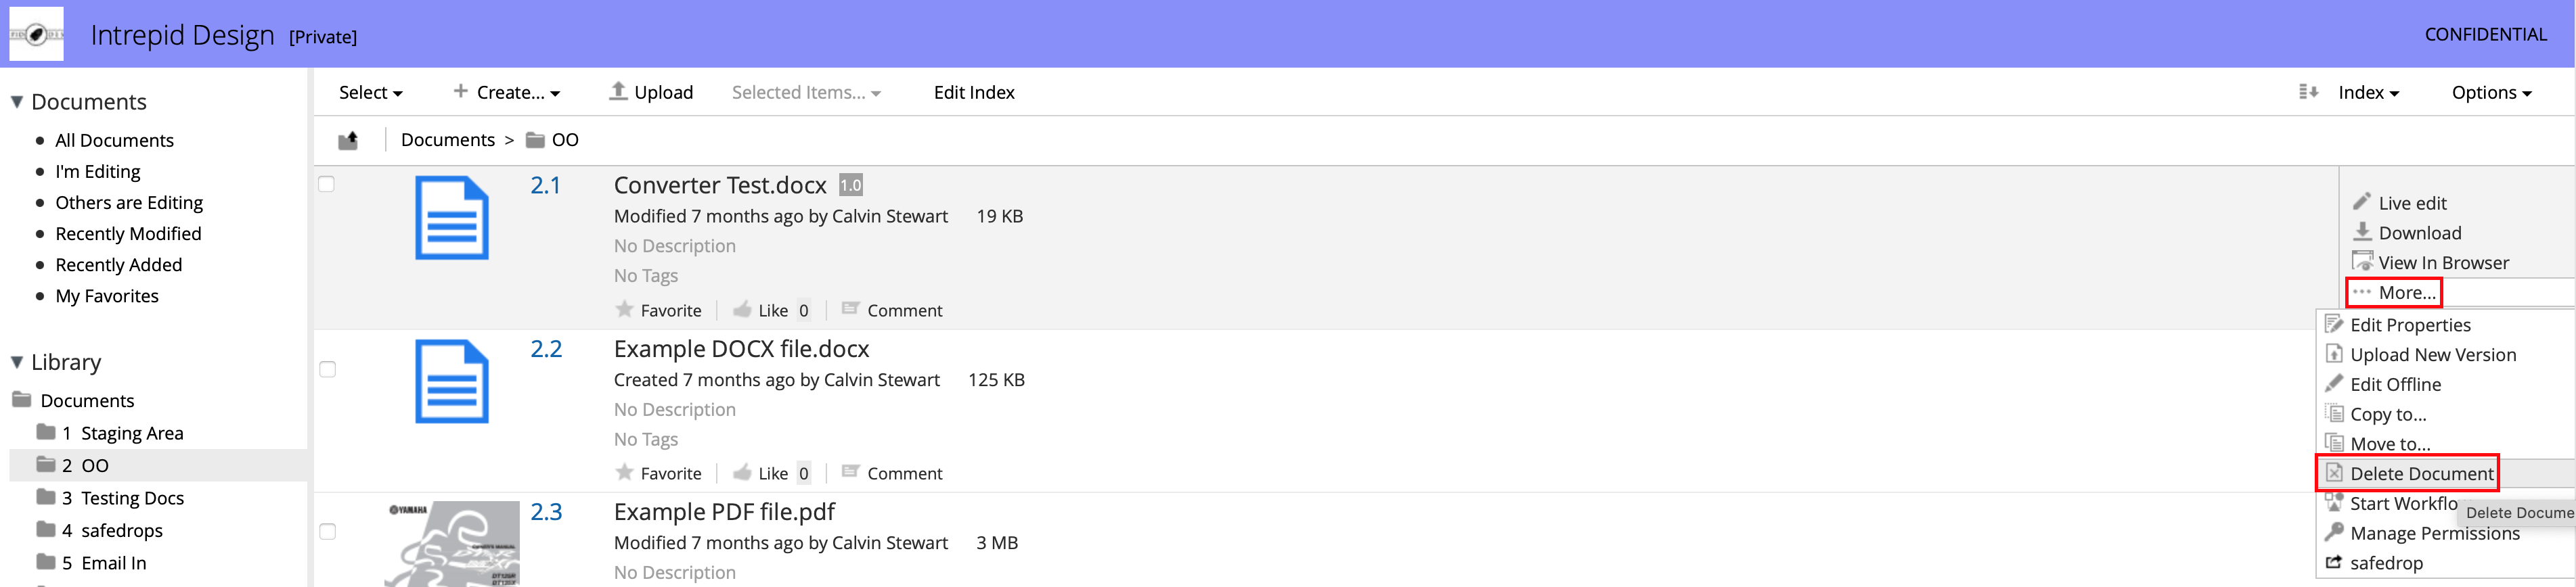
Hover above the file or folder in the document library and press ‘More’ to view more options then click ‘Delete Document’. The file will then be removed from the document library and placed in the trashcan.


How to delete a site

You will need to be a manager of the site you want to delete.

Click ‘Sites’ along the top bar and then click ‘Site finder’ from the bottom section of the drop down.

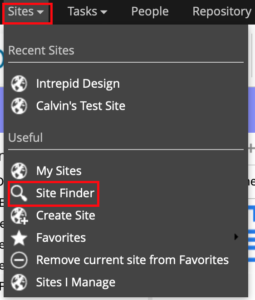
Once the page loads press the search button to display a list of sites you have access too. Or, enter the name of the site you want to delete into the search bar and then click the search button.

If you have manager permission to the site, you will see a delete button to the right of the site.

Click this button to delete the site and place it in the trashcan.

(This may fail on occasion due to rules still applied to folders in the repository, if this happens, please contact support@projectfusion.com and we’ll be happy to help)


The Trashcan

When a file, folder or site is deleted, it is placed in the trashcan. The file then stays there for 28 days until it is automatically removed from the trashcan and deleted from our servers.

During this 28 days, the file or folder can be recovered to the document library back into the folder it was deleted from. You can even recover sites deleted by accident.

Administrators have access to all files, folders and sites deleted across the entire data room. All other users can only recover/delete files that they have deleted themselves. User A will not see any of User B’s deleted files/folders in their trashcan.

The admins can periodically purge the trashcan.

When the trashcan is purged or a file is automatically removed from the trashcan after 28 days, the files are held for 14 days in an encrypted backup, and then automatically deleted.


How to access the Trashcan

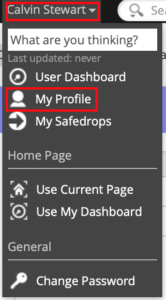
1. Click on your user’s name along the top of the room and then click My Profile from the drop down menu.

2. Click on Trashcan from the list of user profile pages.

3. You will now be in the trashcan where you can see all files deleted by your user. (Or all users if you are an administrator user) Simply press the Delete button to the right of the file to remove the file from the server or click Recover to recover the file back into the document library.

Alternatively, you can click the Empty button at the top right to completely clear the trashcan of files, folders or sites you have access to.

What happens when you terminate your projectfusion instance

At this point we delete all the files and folders from the servers. Copies will remain on our encrypted backups for 14 days, then they will be automatically deleted.

The servers are then deprovisioned. Whenever a server which has contained customer data is deprovisioned its hard disks are labelled as “DIRTY” in our asset management system. Our automated systems will not allow such a hard drive to be redeployed until it has been “cleaned” which we do by overwriting the entire disk with random data twice.

The process is based on DoD and CPNI guidance. This has been reviewed by the PGA and the CHECK ITHC penetration test has been found to be appropriate up to the higher requirements of the PSN (formerly IL3) environment

For purists, yes if data is only overwritten twice it is theoretically possible to examine the hard drive under a scanning electron microscope looking at the edges of the tracks and determine the previous binary state with sufficient accuracy to reconstitute the data (at staggering expense, it should be noted). However, all the hardware remains in our control, in our secure data centres, and access only by our authorised personel. Two wipes is sufficient to prevent data recovery via the hard disks own mechanisms.
At end of life the the disks and their magnetic platters are shredded – reduced to small fragments, from which data recovery would be impossible.

What are your Feelings
Share This Article :
  • Facebook
  • Twitter
  • LinkedIn
  • Pinterest
Updated on May 10, 2022
How To – Login To The Data RoomHow To – Branding
Solutions
  • Data Room
  • Collaborate Portal
  • Digital Courtroom
Resources
  • Videos
  • Downloads
  • Apps
  • Customers
Company
  • Blog
  • Contact
  • Ethics
  • (+44)20 7183 1245
We’re ISO27001 accredited…
We’re also fully GDPR compliant…
We’re also Cyber Essentials certified too!
We give 1% of turnover to charity!
Leave us a review!
  • 2021 OD Consultancy Ltd. All rights reserved
  • Terms
  • Privacy
  • sales@projectfusion.com
  • Projectfusion.com
Twitter
Facebook-square
Linkedin