Menu
  • About Us
  • Pricing
  • Features
SCHEDULE DEMO
Popular Search goodsyncdownload

Advanced Options

  • How To Live Edit A Spreadsheet
  • How To Live Edit A PowerPoint Document
  • Real-Time Collaboration Guide
  • How To Live Edit A Document
  • Using The Projectfusion IOS App
  • Getting Your Data Room Ready For The IOS App
  • Allowing Download Access To Files
  • Projectfusion Closing Bibles
  • Backup And Redundancy Options
  • Archiving Sites The Right Way
  • Getting A Closing Bible Or Archive Of Content
  • Making Changes To Your Billing Account Such As Changing Payment Details, Billing Address, Changing Your VAT Number, Changing Your Billing Account Password Or Cancelling A Subscription
  • Adding Another Credit Card Or Direct Debit Subscription To Your Plan
  • Setting Folder And File Permissions
  • How To Setup And Use Email Upload
  • How To Upload Files Discretely
  • Uploading Or Downloading Files With Windows Web Folders / WebDAV
  • Setting Up Expandrive/Projectfusion Desktop App
  • Uploading & Downloading Files And Folders Using A Zip File
  • How To Access And View Site Reports Using The Reporting Tool
  • Projectfusion Guide To Workflows And Tasks
  • How Do I Create And Use Workflows
  • Site Index Setup And Use
  • Data Lists
  • Bulk Add Users
  • Accepting Invites And Resetting Passwords – Managers & Admins
  • Naming Conventions And Allowed Characters
  • How To Enable Advanced Excel Viewer In Your Site
  • How To Stop All Users Downloading Files
  • How To Add An Image To The Site Dashboard
  • How To Disable Sites (Managers Only)
  • Site Creators Guide
  • How To – Deleting A Site
  • Adding Custom Watermarks To Documents
  • Setting Up Watermarks
  • Setting Up Terms And Conditions
  • Create A Site And Choose Visibility / Social Settings
  • How To Add Users Into A Site Using The Groups Interface (Admin Only)
  • How To Add Yourself Into A Site & Become A Site Manager
  • Trusted Users – For Admins Only
  • Accessing Custom Reports
  • The Audit Dashlet (Administrators)
  • How Do I Customise My Data Room Emails
  • Setting Up A Custom URL With Projectfusion
  • IE6 SSL Protocols / “POODLE” Vulnerability
  • Setting Minimum Password Strength
  • Restricting Projectfusion’s Access To Your Data Room
  • Creating And Adding Users To SITE_CREATORS Groups
  • The “ADMINISTRATORS” Group And How To Add Users To It.
  • CMIS & WebDAV Control Panel
  • Disable Customize User Dashboard
  • Document Comparison
  • How To Send A File Or Folder From Your Document Library Using Safedrop
  • How To Disable Activity Feed On A Per Site Basis
  • How To Disable Recent Activity Emails
  • Getting Changes Made To Projectfusion
  • Open Standards Support
  • Using Mobile Devices With Projectfusion
  • Excel Documents In Previewer
  • How To – Use Tags
  • How To – Upload & Download
  • How to add a video to your site dashboard
  • How to use image previewer
  • How to use Blogs
  • How To – Upload Using iOS App

Safedrop

  • Safedrop Outlook Plugin Guide
  • How To – Use Safedrop Inbox
  • Using Inbox To Receive Files
  • Upload Files That Won’t Expire So You Can Safedrop Them Over And Over Again. ‘Advanced’ Interface Guide
  • Safedrop Admin
  • Safedrop Service Guide
  • Free User Safedrop Service Guide
  • How To Use The Zylpha Safedrop App
  • How To Edit Terms Of Use, Audit Retention And ‘Remember Me’ Times And Change Your API Target Folder (Advanced)
  • How To Receive Your Safedrop
  • How To Access Safedrop From Projectfusion
  • How To – Send a Safedrop
  • How To – Track a Safedrop
  • How to – Use ESIG

Getting Started

  • Getting Started With The iOS App
  • How To – Access And Manage Q&A
  • How To – Add Users
  • Getting Started Video
  • Service Guide For Managers & Admins
  • Quick Start Manual
  • How to – Use ESIG

FAQ

  • Live-Edit Keyboard Shortcuts
  • Our Policy For Upgrading/Downgrading Plans
  • Per Site Billing Option
  • What Are – Roles And Permissions
  • What Is – Autonumbering And Indexing
  • How To – Send an email to entire data room
  • Re-Inviting Members Who Have Left A Site
  • Supported Document Types For Secureview And Preview
  • How To Customise Your Site Dashboard
  • Sites I Manage
  • How To – Search
  • The Site Activity Dashlet
  • 2FA Guide
  • Deleting & Restoring Things From The Recycle Bin
  • Changing The Logo And Theme For All Sites
  • How To – Select / Change Your Home Page
  • Supported Languages
  • How To – Login To The Data Room
  • How To – Delete Files
  • How To – Branding
  • Can I transfer folders between two sites
  • Issues accessing safedrop on Chromium Browsers
  • Q&A Notifications & FAQs
  • Home
  • help
  • Advanced Options
  • Projectfusion Guide To Workflows And Tasks

Projectfusion Guide To Workflows And Tasks

What is a workflow/task?

In Projectfusion, a workflow is a sequence of connected tasks applied to a document or other item of content. Each task can be performed by a person, a group, or automatically.

For example, you might have a document that you needed reviewing and approving by a number of people. The sequence of connected tasks would be:

  • Send an email to each reviewer asking them to review the document within a certain time
  • Each reviewer reviews the document
  • Each reviewer approves or rejects the document
  • If enough reviewers approve, the task is completed successfully

Projectfusion workflows automate the process for you. Users can choose from four workflow definitions provided in Projectfusion. You can also create your own workflow definitions for more complex workflows. The four supplied workflow definitions are:

Adhoc Activiti Process
Enables you to assign a task to a single user
New task 
Enables you to set up assigning a new task to yourself or a colleague.
Parallel Review & Approve (one or more reviewers)
Enables you to set up review and approval of content, assigning the workflow task to multiple users.
Review & Approve (single reviewer)
Enables you to set up review and approval of content, assigning the workflow task to a single user


How do I use workflows/tasks?

1. Start your workflow. You can start workflows from a number of places:

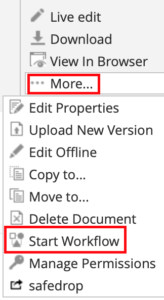
  • Hover over a file in the library and click More then Start Workflow

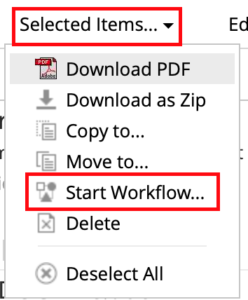
  • Click ‘Selected Items‘ on the toolbar, then click Start Workflow

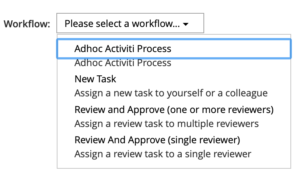
2. Select a workflow from the Workflow drop down list.

The following preconfigured workflows are available:

Adhoc Activiti Process
New task
Parallel Review & Approve (one or more reviewers)
Review & Approve (single reviewer)

Selecting your workflow type will open up the appropriate workflow form with all required details marked with an asterisk (*).

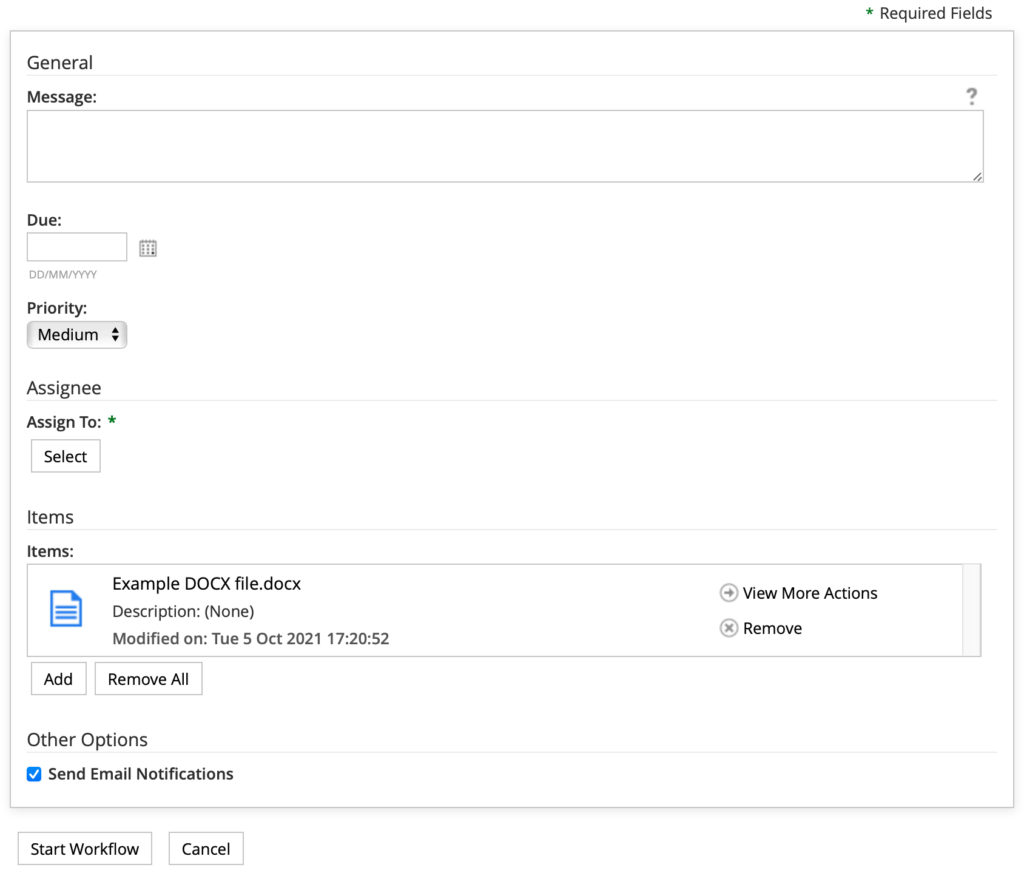
3. Enter details for the workflow in the General section.

  1. In the Message field describe the task requirements, such as ‘Please review the attached content'. This should clearly explain to the user what they are expected to do. This text will be displayed in the My Tasks dashlet for the workflow task.
  2. Select a Due date for the task.
  3. Select a Priority setting for the task.


4. Select the user(s) or group to assign the task generated by the workflow to.

You assign the task to either a user or a user group depending on the type of workflow selected.

    1. In the Assignee section click Select and type the full or partial name of a user.
    2. Click Search.
    3. Click the + icon to select a user. Note:You can select multiple users for the Send Document(s) For Review task.
    4. Click OK.
    5. If your task is assigned to more than one person, complete the Required Approval Percentage field. Enter the percentage of reviewers that must approve the task before it can be marked as complete.

5. Select files to add to your workflow.

If you’ve created the task from a file action list then it’s already associated with that item. You can add more files.

Note:You can link a task to content from any site in the current network that you have permission to access.

  1. Click Add then select a site and then navigate to the files you want to add. The button at the top of the list indicates your current location. Click this to display the full path; click an entry to return to that point in the path. Click the up arrow to return to the previous level.
  2. Click the + Add icon to add a file to the task.
  3. Click OK when you’re done.

    6. Final options.

    Once the file or files are added to the task. You can click:

    • View More Actions to the right of an file in this list to display it on the file preview screen. This will cancel the task and you’ll need to start again.
    • Remove to delete an file from the task.
    • Remove All to delete all files from the task.
    • You can select the Send Email Notifications check box to automatically send an email to users each time a task is assigned to them.

    7. Click ‘Start Workflow’


    Notes

    Tasks will still appear in the users My Tasks dashlet. The email is sent to the email address listed in the user’s profile. If an address is not provided, no email will be sent.

    For group and pooled tasks, every member of the selected group will receive the Click Start Workflow.

    In the file list an icon to the left of the files selected indicates that they are part of an active workflow.

    What are your Feelings
    Share This Article :
    • Facebook
    • Twitter
    • LinkedIn
    • Pinterest
    Updated on May 13, 2022
    How To Access And View Site Reports Using The Reporting ToolHow Do I Create And Use Workflows
    Solutions
    • Data Room
    • Collaborate Portal
    • Digital Courtroom
    Resources
    • Videos
    • Downloads
    • Apps
    • Customers
    Company
    • Blog
    • Contact
    • Ethics
    • (+44)20 7183 1245
    We’re ISO27001 accredited…
    We’re also fully GDPR compliant…
    We’re also Cyber Essentials certified too!
    We give 1% of turnover to charity!
    Leave us a review!
    • 2021 OD Consultancy Ltd. All rights reserved
    • Terms
    • Privacy
    • sales@projectfusion.com
    • Projectfusion.com
    Twitter
    Facebook-square
    Linkedin