Menu
  • About Us
  • Pricing
  • Features
SCHEDULE DEMO
Popular Search goodsyncdownload

Advanced Options

  • How To Live Edit A Spreadsheet
  • How To Live Edit A PowerPoint Document
  • Real-Time Collaboration Guide
  • How To Live Edit A Document
  • Using The Projectfusion IOS App
  • Getting Your Data Room Ready For The IOS App
  • Allowing Download Access To Files
  • Projectfusion Closing Bibles
  • Backup And Redundancy Options
  • Archiving Sites The Right Way
  • Getting A Closing Bible Or Archive Of Content
  • Making Changes To Your Billing Account Such As Changing Payment Details, Billing Address, Changing Your VAT Number, Changing Your Billing Account Password Or Cancelling A Subscription
  • Adding Another Credit Card Or Direct Debit Subscription To Your Plan
  • Setting Folder And File Permissions
  • How To Setup And Use Email Upload
  • How To Upload Files Discretely
  • Uploading Or Downloading Files With Windows Web Folders / WebDAV
  • Setting Up Expandrive/Projectfusion Desktop App
  • Uploading & Downloading Files And Folders Using A Zip File
  • How To Access And View Site Reports Using The Reporting Tool
  • Projectfusion Guide To Workflows And Tasks
  • How Do I Create And Use Workflows
  • Site Index Setup And Use
  • Data Lists
  • Bulk Add Users
  • Accepting Invites And Resetting Passwords – Managers & Admins
  • Naming Conventions And Allowed Characters
  • How To Enable Advanced Excel Viewer In Your Site
  • How To Stop All Users Downloading Files
  • How To Add An Image To The Site Dashboard
  • How To Disable Sites (Managers Only)
  • Site Creators Guide
  • How To – Deleting A Site
  • Adding Custom Watermarks To Documents
  • Setting Up Watermarks
  • Setting Up Terms And Conditions
  • Create A Site And Choose Visibility / Social Settings
  • How To Add Users Into A Site Using The Groups Interface (Admin Only)
  • How To Add Yourself Into A Site & Become A Site Manager
  • Trusted Users – For Admins Only
  • Accessing Custom Reports
  • The Audit Dashlet (Administrators)
  • How Do I Customise My Data Room Emails
  • Setting Up A Custom URL With Projectfusion
  • IE6 SSL Protocols / “POODLE” Vulnerability
  • Setting Minimum Password Strength
  • Restricting Projectfusion’s Access To Your Data Room
  • Creating And Adding Users To SITE_CREATORS Groups
  • The “ADMINISTRATORS” Group And How To Add Users To It.
  • CMIS & WebDAV Control Panel
  • Disable Customize User Dashboard
  • Document Comparison
  • How To Send A File Or Folder From Your Document Library Using Safedrop
  • How To Disable Activity Feed On A Per Site Basis
  • How To Disable Recent Activity Emails
  • Getting Changes Made To Projectfusion
  • Open Standards Support
  • Using Mobile Devices With Projectfusion
  • Excel Documents In Previewer
  • How To – Use Tags
  • How To – Upload & Download
  • How to add a video to your site dashboard
  • How to use image previewer
  • How to use Blogs
  • How To – Upload Using iOS App

Safedrop

  • Safedrop Outlook Plugin Guide
  • How To – Use Safedrop Inbox
  • Using Inbox To Receive Files
  • Upload Files That Won’t Expire So You Can Safedrop Them Over And Over Again. ‘Advanced’ Interface Guide
  • Safedrop Admin
  • Safedrop Service Guide
  • Free User Safedrop Service Guide
  • How To Use The Zylpha Safedrop App
  • How To Edit Terms Of Use, Audit Retention And ‘Remember Me’ Times And Change Your API Target Folder (Advanced)
  • How To Receive Your Safedrop
  • How To Access Safedrop From Projectfusion
  • How To – Send a Safedrop
  • How To – Track a Safedrop
  • How to – Use ESIG

Getting Started

  • Getting Started With The iOS App
  • How To – Access And Manage Q&A
  • How To – Add Users
  • Getting Started Video
  • Service Guide For Managers & Admins
  • Quick Start Manual
  • How to – Use ESIG

FAQ

  • Live-Edit Keyboard Shortcuts
  • Our Policy For Upgrading/Downgrading Plans
  • Per Site Billing Option
  • What Are – Roles And Permissions
  • What Is – Autonumbering And Indexing
  • How To – Send an email to entire data room
  • Re-Inviting Members Who Have Left A Site
  • Supported Document Types For Secureview And Preview
  • How To Customise Your Site Dashboard
  • Sites I Manage
  • How To – Search
  • The Site Activity Dashlet
  • 2FA Guide
  • Deleting & Restoring Things From The Recycle Bin
  • Changing The Logo And Theme For All Sites
  • How To – Select / Change Your Home Page
  • Supported Languages
  • How To – Login To The Data Room
  • How To – Delete Files
  • How To – Branding
  • Can I transfer folders between two sites
  • Issues accessing safedrop on Chromium Browsers
  • Q&A Notifications & FAQs
  • Home
  • help
  • Safedrop
  • How To – Use Safedrop Inbox

How To – Use Safedrop Inbox

This help article will show you how to send someone files using safedrop inbox after receiving their safedrop inbox link.

First, click the inbox link you have been provided with.

You’ll then be brought to the inbox page of the safedrop user.  See below. In this example, the user who provided the link is ‘naw@projectfusion.com’.


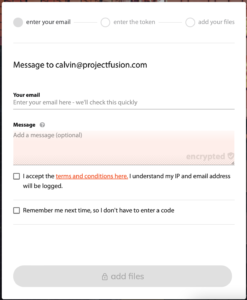
To begin with you’ll need to enter your email address. (you need access to the inbox of the address that you enter as you will be asked to enter a security token that will be sent via email)

You can then add an optional message in the box highlighted in orange. (this message will only be shown once the recipient accesses the file online. It will not be shown in any email message body.)

In order to continue, you’ll need to first accept the terms and conditions by ticking the tickbox on the left side. If this is not ticked, you will not be able to progress. (see below)

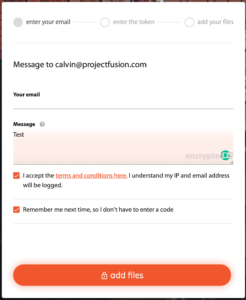
Once the terms and conditions have been accepted, the ‘add files’ button will become available.

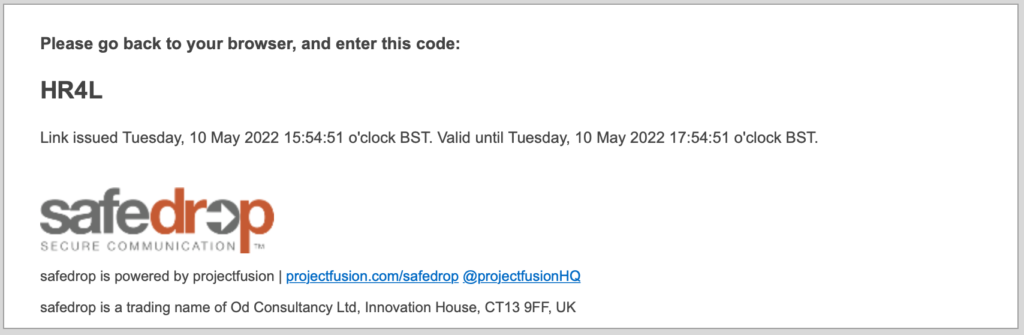
Clicking it will then automatically send you a security token by email and you’ll be asked to enter the token on to the page (if you don’t want to do this each time you are sending a file via inbox, make sure ‘Remember me’ is ticked  and your browser will be remembered) See below for token entry page.

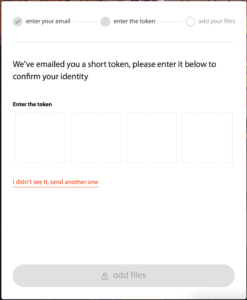
After successfully entering your token and clicking the ‘add files’ button to continue, you will be able to edit your message and add the files you want to send.

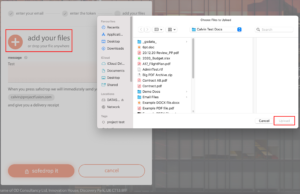
To attach files, simply drag and drop them from your desktop onto the safedrop page or click on the ‘+’ symbol to open a folder browser so you can select files that way.

Once you have completed this and have confirmed your message is correct, click ‘safedrop it’ to send your files to the email address shown at the top of the page.

You will receive an email receipt confirming your files have been sent and the recipient will receive an email with a link to access the files.

If you have any issues or questions, please contact support@safedrop.com

What are your Feelings
Share This Article :
  • Facebook
  • Twitter
  • LinkedIn
  • Pinterest
Updated on May 10, 2022
Safedrop Outlook Plugin GuideUsing Inbox To Receive Files
Solutions
  • Data Room
  • Collaborate Portal
  • Digital Courtroom
Resources
  • Videos
  • Downloads
  • Apps
  • Customers
Company
  • Blog
  • Contact
  • Ethics
  • (+44)20 7183 1245
We’re ISO27001 accredited…
We’re also fully GDPR compliant…
We’re also Cyber Essentials certified too!
We give 1% of turnover to charity!
Leave us a review!
  • 2021 OD Consultancy Ltd. All rights reserved
  • Terms
  • Privacy
  • sales@projectfusion.com
  • Projectfusion.com
Twitter
Facebook-square
Linkedin