This Article will show you how to store large files in our advanced interface to send multiple safedrops without the need to upload the file every time.
Using our Advanced Interface, you’ll be able to upload a file into a storage area and from there you’ll be able to send as many safedrops as you want using that file and it will not be deleted from the service until you manually delete it.
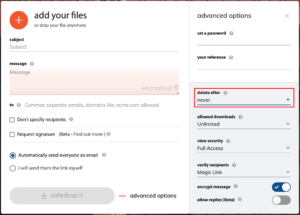
To begin with, login to your safedrop service and send a safedrop with no recipient and with the ‘delete after’ option set to ‘Never’. (you’ll need to scroll down to the bottom of the list to see it)
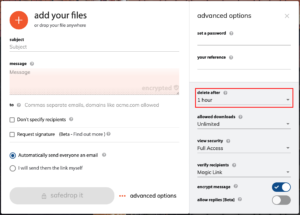
(You do not need to add any files to this safedrop but you will need to put at least 1 character into the message box to be able to send it.)
Once you have sent the empty safedrop successfully, click ‘track safedrops’ along the top of the page.
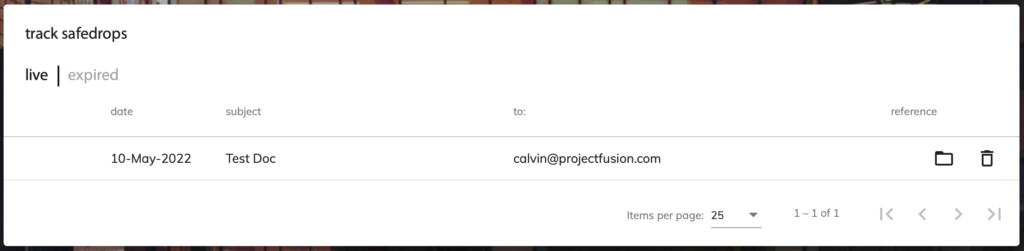
You’ll be taken to the tracking page where you can see a list of all safedrops you have sent and their audit trails. The safedrop you just sent should be at the very top of the list, so once you can see it, click the folder icon to the right hand side of the safedrop to be taken into the ADVANCED INTERFACE.
![]()
Once you have clicked the folder icon, you’ll be taken to the folder that your safedrop is linked to within the advanced interface. If you did not add any files to the safedrop you sent at the beginning of these instructions, you will not see any files here.
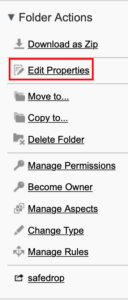
From here, you’ll need to click on the ‘expand folder link’ as shown outlined in red below.


You’ll now see the folder options menu on the right hand side of the page. Click ‘Edit Properties’ from the menu as shown outlined in red below.
You will then be able to rename the folder to call it ’01 My files’ or any other easily distinguishable folder name. I would suggest placing an ’01’ at the beginning of your folder name so that it is easily findable in the advanced interface. Make sure you click Save to save all of your changes.

Now that you have renamed your folder, click on the new folder name link (as shown outlined in red below) to be brought back to the folder.

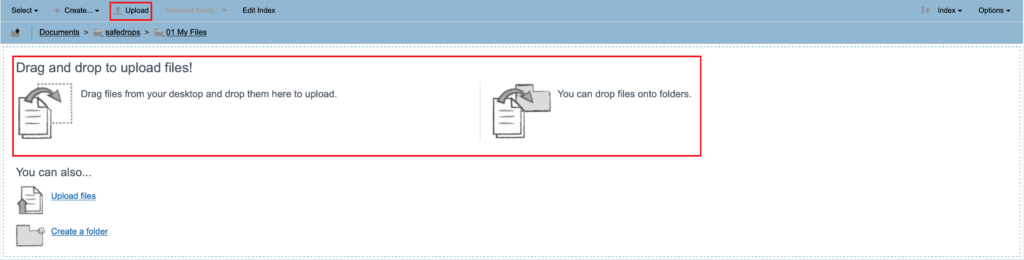
You can now upload any large files that you plan to send out multiple times. This will drastically reduce the upload time of multiple safedrops all containing the same files.
You can do this by dragging and dropping files from your desktop into the browser or by clicking the ‘Upload’ button to open a file search box. Both methods are outlined in the below screenshot.
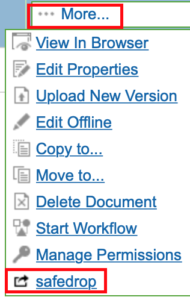
Once your file is fully uploaded and you are ready to send it out, hover your mouse above the file you want to send and click ‘More’ from the options on the right hand side then click ‘safedrop’ from the expanded drop down menu.
This will open the safedrop pop up where you can then click ‘new safedrop’.

This will open the safedrop pop up and from here you can send your safedrop. This interface may look a little different to the usual safedrop interface but the same security features are available (apart from the password feature)
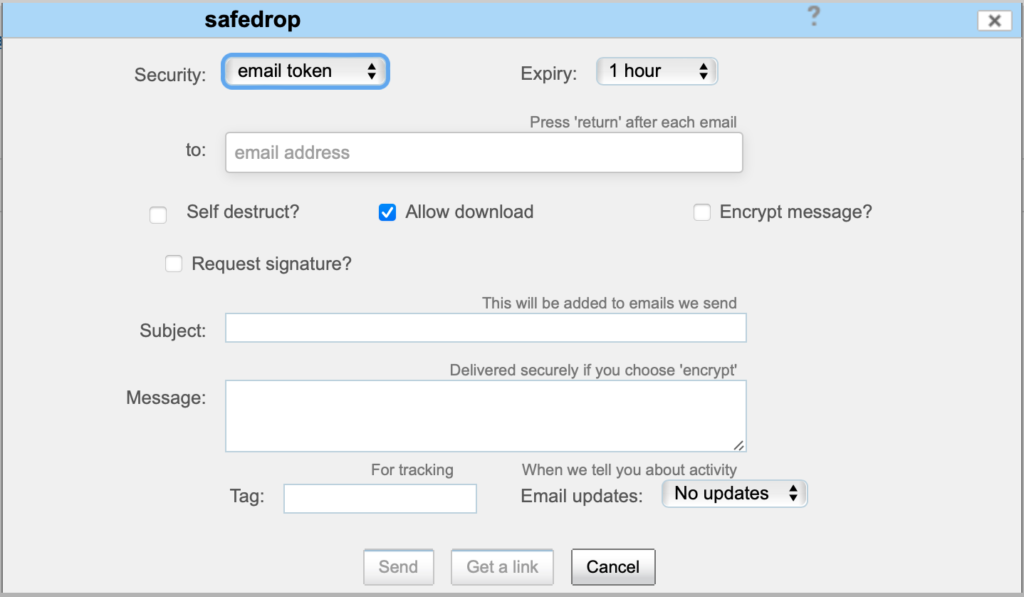
1. Security – There are two options in this drop down menu: ‘secure link’ and ‘email verification’.
Secure link – the recipient receives an email with a link to download the drop. Email verification – the recipient must first click on a token link that is sent to their email address to verify their identity. This is not necessary however, it does add an extra layer of security.
2. Expiry – The expiry of the safedrop can range from 1 hour to 3 months. You can change this depending on how long you would like the drop to be active i.e. how long you want the files to be available to download. When the safedrop expires, the recipient or anyone with the secure link will no longer be able to access the drop or the files within and the file will be deleted from our server within 2 minutes of the expiry time.
3. Email address – This is the field where you enter the email address of the safedrop recipient/s.To send the safedrop to more than one recipient, enter the first recipient’s email address and then press enter. You can then enter the emails of the other recipients pressing enter at the end of each address. (If you’re sending a drop as a Secure link to multiple recipients, make sure you do not have self destruct enabled otherwise only 1 of the recipients will be able to access the file)
4. Self destruct – This controls the number of downloads per file. If this box is ticked, the file/s sent will self destruct after 1 download; the file/’s will no longer be available to download. If the box is left clear, there will be no download limit for the file/’s and they will be available to download until the safedrop expires or the sender expires the drop manually.
6. Encrypt message – Leaving this box clear displays the message to the recipient in the safedrop email that is sent. Ticking this box does not display the message in the safedrop and the recipient has to click on the link to view the message in the drop.
5. Allow download – Sending a safedrop with this tickbox checked will allow the recipient to download all files in the safedrop as well as preview them online. Sending a safedrop with this tickbox unchecked will only allow the recipient to view the files online. They will not be able to download the files.
6. Encrypt message – Leaving this box clear displays the message to the recipient in the safedrop email that is sent. Ticking this box does not display the message in the safedrop and the recipient has to click on the link to view the message in the drop.
Finally, after you have filled in all the necessary fields and are ready to send the drop, you can either click Send or Get a link. Clicking Send will send the recipient/s an email with the link to collect the drop. Clicking Get a link will open a pop up window with the link needed to access the drop, you can then copy this link and send it to anyone you like and they will then be able to access the files.
Note: sending multiple large files in a safedrop can be achieved but a folder will need to be created and the files added/moved into there. Then the folder itself can be sent in a safedrop and all files in the folder will be accessible in the safedrop sent. If any files are added into this folder after the safedrop has been sent, the recipient will also be able to see/access all the new files so If you want to use the same folder again for a new safedrop, remember to expire the previous safedrop so the old recipient doesn’t retain access to the safedrop folder.