Menu
  • About Us
  • Pricing
  • Features
SCHEDULE DEMO
Popular Search goodsyncdownload

Advanced Options

  • How To Live Edit A Spreadsheet
  • How To Live Edit A PowerPoint Document
  • Real-Time Collaboration Guide
  • How To Live Edit A Document
  • Using The Projectfusion IOS App
  • Getting Your Data Room Ready For The IOS App
  • Allowing Download Access To Files
  • Projectfusion Closing Bibles
  • Backup And Redundancy Options
  • Archiving Sites The Right Way
  • Getting A Closing Bible Or Archive Of Content
  • Making Changes To Your Billing Account Such As Changing Payment Details, Billing Address, Changing Your VAT Number, Changing Your Billing Account Password Or Cancelling A Subscription
  • Adding Another Credit Card Or Direct Debit Subscription To Your Plan
  • Setting Folder And File Permissions
  • How To Setup And Use Email Upload
  • How To Upload Files Discretely
  • Uploading Or Downloading Files With Windows Web Folders / WebDAV
  • Setting Up Expandrive/Projectfusion Desktop App
  • Uploading & Downloading Files And Folders Using A Zip File
  • How To Access And View Site Reports Using The Reporting Tool
  • Projectfusion Guide To Workflows And Tasks
  • How Do I Create And Use Workflows
  • Site Index Setup And Use
  • Data Lists
  • Bulk Add Users
  • Accepting Invites And Resetting Passwords – Managers & Admins
  • Naming Conventions And Allowed Characters
  • How To Enable Advanced Excel Viewer In Your Site
  • How To Stop All Users Downloading Files
  • How To Add An Image To The Site Dashboard
  • How To Disable Sites (Managers Only)
  • Site Creators Guide
  • How To – Deleting A Site
  • Adding Custom Watermarks To Documents
  • Setting Up Watermarks
  • Setting Up Terms And Conditions
  • Create A Site And Choose Visibility / Social Settings
  • How To Add Users Into A Site Using The Groups Interface (Admin Only)
  • How To Add Yourself Into A Site & Become A Site Manager
  • Trusted Users – For Admins Only
  • Accessing Custom Reports
  • The Audit Dashlet (Administrators)
  • How Do I Customise My Data Room Emails
  • Setting Up A Custom URL With Projectfusion
  • IE6 SSL Protocols / “POODLE” Vulnerability
  • Setting Minimum Password Strength
  • Restricting Projectfusion’s Access To Your Data Room
  • Creating And Adding Users To SITE_CREATORS Groups
  • The “ADMINISTRATORS” Group And How To Add Users To It.
  • CMIS & WebDAV Control Panel
  • Disable Customize User Dashboard
  • Document Comparison
  • How To Send A File Or Folder From Your Document Library Using Safedrop
  • How To Disable Activity Feed On A Per Site Basis
  • How To Disable Recent Activity Emails
  • Getting Changes Made To Projectfusion
  • Open Standards Support
  • Using Mobile Devices With Projectfusion
  • Excel Documents In Previewer
  • How To – Use Tags
  • How To – Upload & Download
  • How to add a video to your site dashboard
  • How to use image previewer
  • How to use Blogs
  • How To – Upload Using iOS App

Safedrop

  • Safedrop Outlook Plugin Guide
  • How To – Use Safedrop Inbox
  • Using Inbox To Receive Files
  • Upload Files That Won’t Expire So You Can Safedrop Them Over And Over Again. ‘Advanced’ Interface Guide
  • Safedrop Admin
  • Safedrop Service Guide
  • Free User Safedrop Service Guide
  • How To Use The Zylpha Safedrop App
  • How To Edit Terms Of Use, Audit Retention And ‘Remember Me’ Times And Change Your API Target Folder (Advanced)
  • How To Receive Your Safedrop
  • How To Access Safedrop From Projectfusion
  • How To – Send a Safedrop
  • How To – Track a Safedrop
  • How to – Use ESIG
  • Safedrop Reminders

Getting Started

  • Getting Started With The iOS App
  • How To – Access And Manage Q&A
  • How To – Add Users
  • Getting Started Video
  • Service Guide For Managers & Admins
  • Quick Start Manual
  • How to – Use ESIG

FAQ

  • Live-Edit Keyboard Shortcuts
  • Our Policy For Upgrading/Downgrading Plans
  • Per Site Billing Option
  • What Are – Roles And Permissions
  • What Is – Autonumbering And Indexing
  • How To – Send an email to entire data room
  • Re-Inviting Members Who Have Left A Site
  • Supported Document Types For Secureview And Preview
  • How To Customise Your Site Dashboard
  • Sites I Manage
  • How To – Search
  • The Site Activity Dashlet
  • 2FA Guide
  • Deleting & Restoring Things From The Recycle Bin
  • Changing The Logo And Theme For All Sites
  • How To – Select / Change Your Home Page
  • Supported Languages
  • How To – Login To The Data Room
  • How To – Delete Files
  • How To – Branding
  • Can I transfer folders between two sites
  • Issues accessing safedrop on Chromium Browsers
  • Q&A Notifications & FAQs
  • Home
  • help
  • Safedrop
  • Free User Safedrop Service Guide

Free User Safedrop Service Guide

Compose your safedrop

After logging in for the first time and changing your password, you will be brought to the Compose page. You can use this page to send your safedrops. (See below)

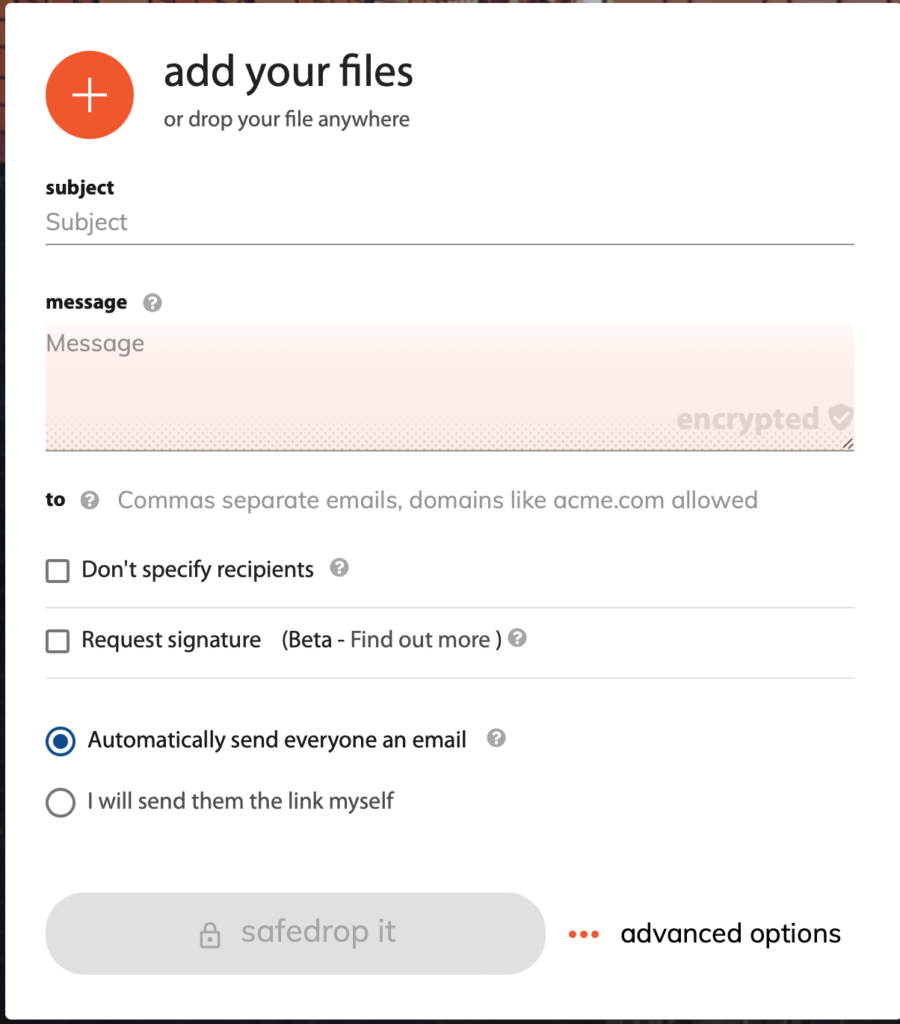
1. Adding files to your safedrop – To add files to your safedrop, you can either drag and drop files from folders or your desktop, straight into your browser or click on the orange circle to open a folder browsing window where you can select the files you wish to add.

2. Email address – This is the field where you enter the email address of the safedrop recipient/s.To send the safedrop to more than one recipient, enter the first recipient’s email address and then press enter. You can then enter the emails of the other recipients pressing enter at the end of each address. (If you’re sending a safedrop as a Secure link to multiple recipients, make sure you do not have self destruct enabled otherwise only 1 of the recipients will be able to access the file)

3. Expiry – The expiry of the safedrop can range from 1 hour to forever. You can change this depending on how long you would like the safedrop to be active i.e. how long you want the files to be available to download. When the safedrop expires, the recipient or anyone with the secure link will no longer be able to access the safedrop or the files within and the file will be deleted from our server within 2 minutes of the expiry time.

4. Allowed Downloads – This controls the number of downloads per file. If 1 is selected, the file/s sent will self destruct after 1 download; the file/’s will no longer be available to download. If ‘Unlimited’ is selected, there will be no download limit for the file/’s and they will be available to download until the safedrop expires or the sender expires the safedrop manually.

5. View Security – There are two options to choose from in this drop down menu. Full access allows the recipients to both view and download the files in the safedrop. View on-screen only allows the users to preview the files online and does not allow them to download them at all. 

6. Verify recipients  – There are three options in this drop down menu: ‘secure link’ and ‘email verification’. 

Off– the recipient receives an email with a link to download the safedrop.                            

Enter Email address – the recipient is first prompted to enter their email address before being allowed access to their safedrop. 

Magic link (recommended) – the recipient must first click on a magic link that is sent to their email address to verify their identity. This adds an extra layer of security and allows the reply function to be used. 

7. Encrypt message – Leaving this toggle unticked displays the message to the recipient in the safedrop email that is sent. Ticking this toggle does not display the message in the safedrop and the recipient has to click on the link to view the message in the safedrop.

8. Allow Replies [Beta] – This feature, available only when Magic link verification has been selected, allows the safedrop recipients to reply and attach files to the safedrop. Those files are then viewable and downloadable by both the original safedrop sender and all recipients.

If you would like another layer of security added to your safedrop, you can always use the Password feature at the top of the advanced options menu. Simply add your password in that box to encrypt the safedrop further, just don’t forget to let your recipients know what it is!

After you have filled in all the necessary fields, and are ready to send the safedrop, you can either choose Automatically send everyone an email or I will send them the link myself.

Clicking ‘safedrop it’ with Automatically send everyone an email chosen will send the recipient/s and email with the link to collect the safedrop. Clicking ‘safedrop it’ with I will send them the link myself chosen will direct you to a page with the link needed to access the safedrop, you can then copy this link and send it to anyone you like and they will then be able to access the files.

If you send a safedrop without specifying a recipient, a link will be generated and you can copy and paste the link to whoever you want.

Track and manage your safedrops.

To view a list of all your current safedrops, click on the ‘Track Safedrops’ button at the top of the page.

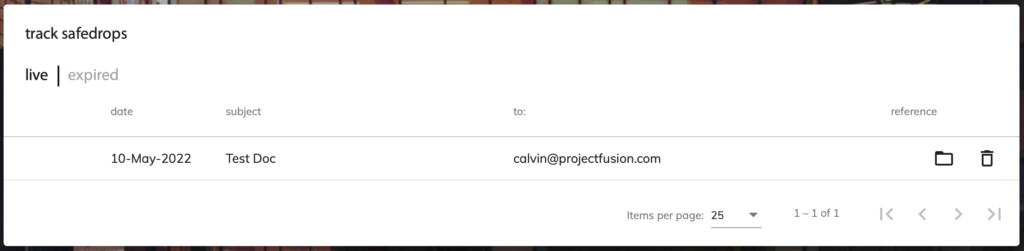
As you can see above, each of your user’s safedrops will be shown here. You can see the date sent, the subject of the safedrop and the recipient email addresses.

Clicking on the line of each drop will open up the safedrop details showing the security settings used and the names of any attachments.

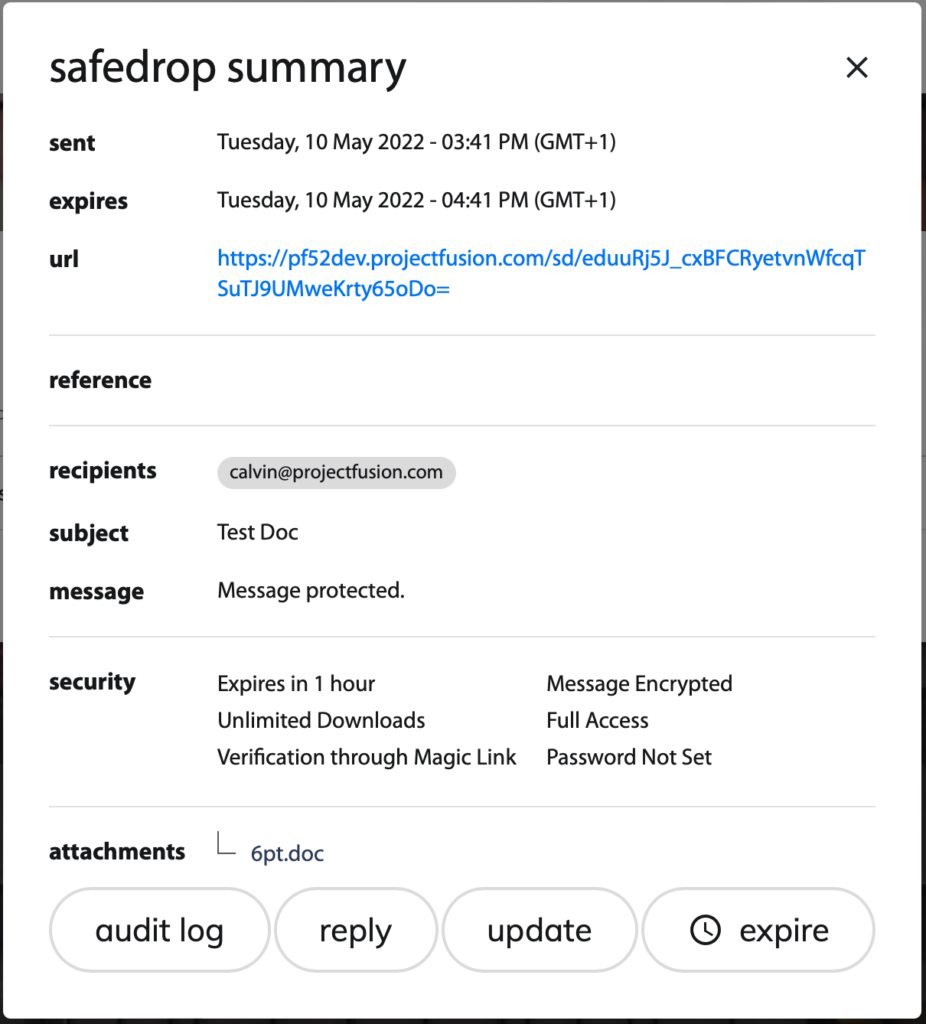
Clicking ‘audit log’ will display the safedrop audit trail.

From here, you can see the time and date the safedrop was sent and the recipient details including when they downloaded the file and what their IP was.

Clicking expire safedrop will open a pop up confirmation window and clicking ‘Yes’ will delete the safedrop, regardless of its expiry time.

This means that even if the recipients still have a link, they will not be able to access the safedrop.

You will then receive a ‘Safedrop Expired’ message to confirm to you that the safedrop has been deleted and the files are no longer accessible. The file/s will then be deleted from the API target folder within the next 2 minutes of the expiry time.

If your site has allowed audit retention then you will be able to see your expired safedrops by clicking on the ‘expired’ tab in the track safedrops page.

What are your Feelings
Share This Article :
  • Facebook
  • Twitter
  • LinkedIn
  • Pinterest
Updated on May 11, 2022
Safedrop Service GuideHow To Use The Zylpha Safedrop App
Solutions
  • Data Room
  • Collaborate Portal
  • Digital Courtroom
Resources
  • Videos
  • Downloads
  • Apps
  • Customers
Company
  • Blog
  • Contact
  • Ethics
  • (+44)20 7183 1245
We’re ISO27001 accredited…
We’re also fully GDPR compliant…
We’re also Cyber Essentials certified too!
We give 1% of turnover to charity!
Leave us a review!
  • 2021 OD Consultancy Ltd. All rights reserved
  • Terms
  • Privacy
  • sales@projectfusion.com
  • Projectfusion.com
Twitter
Facebook-square
Linkedin