Menu
  • About Us
  • Pricing
  • Features
SCHEDULE DEMO
Popular Search goodsyncdownload

Advanced Options

  • How To Live Edit A Spreadsheet
  • How To Live Edit A PowerPoint Document
  • Real-Time Collaboration Guide
  • How To Live Edit A Document
  • Using The Projectfusion IOS App
  • Getting Your Data Room Ready For The IOS App
  • Allowing Download Access To Files
  • Projectfusion Closing Bibles
  • Backup And Redundancy Options
  • Archiving Sites The Right Way
  • Getting A Closing Bible Or Archive Of Content
  • Making Changes To Your Billing Account Such As Changing Payment Details, Billing Address, Changing Your VAT Number, Changing Your Billing Account Password Or Cancelling A Subscription
  • Adding Another Credit Card Or Direct Debit Subscription To Your Plan
  • Setting Folder And File Permissions
  • How To Setup And Use Email Upload
  • How To Upload Files Discretely
  • Uploading Or Downloading Files With Windows Web Folders / WebDAV
  • Setting Up Expandrive/Projectfusion Desktop App
  • Uploading & Downloading Files And Folders Using A Zip File
  • How To Access And View Site Reports Using The Reporting Tool
  • Projectfusion Guide To Workflows And Tasks
  • How Do I Create And Use Workflows
  • Site Index Setup And Use
  • Data Lists
  • Bulk Add Users
  • Accepting Invites And Resetting Passwords – Managers & Admins
  • Naming Conventions And Allowed Characters
  • How To Enable Advanced Excel Viewer In Your Site
  • How To Stop All Users Downloading Files
  • How To Add An Image To The Site Dashboard
  • How To Disable Sites (Managers Only)
  • Site Creators Guide
  • How To – Deleting A Site
  • Adding Custom Watermarks To Documents
  • Setting Up Watermarks
  • Setting Up Terms And Conditions
  • Create A Site And Choose Visibility / Social Settings
  • How To Add Users Into A Site Using The Groups Interface (Admin Only)
  • How To Add Yourself Into A Site & Become A Site Manager
  • Trusted Users – For Admins Only
  • Accessing Custom Reports
  • The Audit Dashlet (Administrators)
  • How Do I Customise My Data Room Emails
  • Setting Up A Custom URL With Projectfusion
  • IE6 SSL Protocols / “POODLE” Vulnerability
  • Setting Minimum Password Strength
  • Restricting Projectfusion’s Access To Your Data Room
  • Creating And Adding Users To SITE_CREATORS Groups
  • The “ADMINISTRATORS” Group And How To Add Users To It.
  • CMIS & WebDAV Control Panel
  • Disable Customize User Dashboard
  • Document Comparison
  • How To Send A File Or Folder From Your Document Library Using Safedrop
  • How To Disable Activity Feed On A Per Site Basis
  • How To Disable Recent Activity Emails
  • Getting Changes Made To Projectfusion
  • Open Standards Support
  • Using Mobile Devices With Projectfusion
  • Excel Documents In Previewer
  • How To – Use Tags
  • How To – Upload & Download
  • How to add a video to your site dashboard
  • How to use image previewer
  • How to use Blogs
  • How To – Upload Using iOS App

Safedrop

  • Safedrop Outlook Plugin Guide
  • How To – Use Safedrop Inbox
  • Using Inbox To Receive Files
  • Upload Files That Won’t Expire So You Can Safedrop Them Over And Over Again. ‘Advanced’ Interface Guide
  • Safedrop Admin
  • Safedrop Service Guide
  • Free User Safedrop Service Guide
  • How To Use The Zylpha Safedrop App
  • How To Edit Terms Of Use, Audit Retention And ‘Remember Me’ Times And Change Your API Target Folder (Advanced)
  • How To Receive Your Safedrop
  • How To Access Safedrop From Projectfusion
  • How To – Send a Safedrop
  • How To – Track a Safedrop
  • How to – Use ESIG
  • Safedrop Reminders

Getting Started

  • Getting Started With The iOS App
  • How To – Access And Manage Q&A
  • How To – Add Users
  • Getting Started Video
  • Service Guide For Managers & Admins
  • Quick Start Manual
  • How to – Use ESIG

FAQ

  • Live-Edit Keyboard Shortcuts
  • Our Policy For Upgrading/Downgrading Plans
  • Per Site Billing Option
  • What Are – Roles And Permissions
  • What Is – Autonumbering And Indexing
  • How To – Send an email to entire data room
  • Re-Inviting Members Who Have Left A Site
  • Supported Document Types For Secureview And Preview
  • How To Customise Your Site Dashboard
  • Sites I Manage
  • How To – Search
  • The Site Activity Dashlet
  • 2FA Guide
  • Deleting & Restoring Things From The Recycle Bin
  • Changing The Logo And Theme For All Sites
  • How To – Select / Change Your Home Page
  • Supported Languages
  • How To – Login To The Data Room
  • How To – Delete Files
  • How To – Branding
  • Can I transfer folders between two sites
  • Issues accessing safedrop on Chromium Browsers
  • Q&A Notifications & FAQs
  • Home
  • help
  • Advanced Options
  • How To Live Edit A Spreadsheet

How To Live Edit A Spreadsheet

How to begin

As a collaborator or manager, navigate to the document library and hover your mouse above the file you would like to live edit. Click ‘Live edit’ to begin your collaboration session in a new tab.

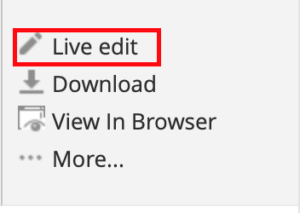
If you do not have permission to edit the document, the ‘Live edit’ option will not be available to you.

All changes will be saved automatically and to exit the session, simply close the live edit tab in your browser.

The interface

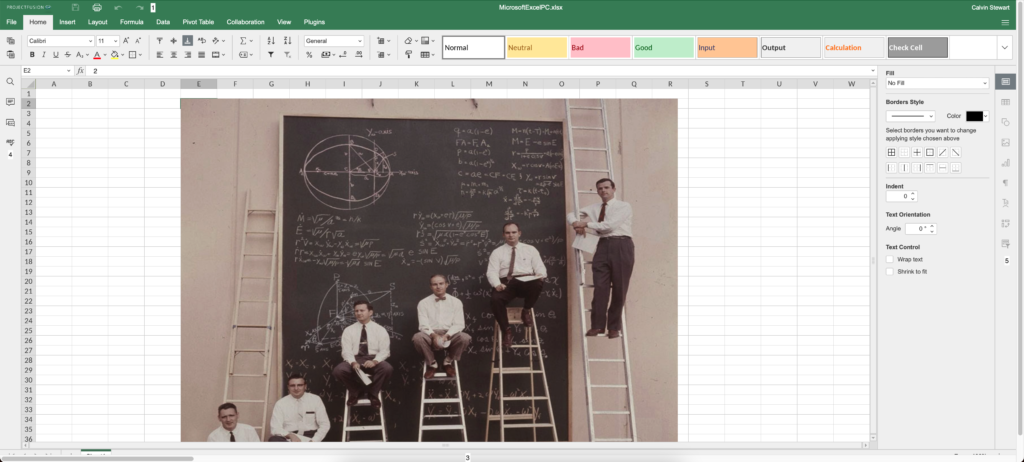
  1. The top toolbar contains the Print, Save, Copy, Paste, Undo and Redo options.
    Icons on the top toolbarThis bar will contain most of the options you’d usually find in a spreadsheet editor such as ‘Insert Image‘, ‘Align left‘ or ‘Add Hyperlink‘ and also contains table options like ‘Insert Function.
  2. The formula bar allows you to enter and edit formulas or values in the cells and displays the content of the currently selected cell.
  3. The status bar at the bottom of the editor window contains some navigation tools: sheet navigation buttons, sheet tabs, and zoom buttons. The Status bar also displays the number of filtered records if you apply a filter, or the results of the automatic calculations if you select several cells containing data.
  4. The left sidebar contains icons that allow you to use the Search and Replace tool, open the Comments and Chat panel, contact our support team and view the information about the program. At the top of this sidebar is the ‘File’ menu option. Click this to expand and you will see options to view document info, ‘Save’, ‘Print’ and ‘Download as’. You can also access advanced settings to change the co-editing mode or turn autosave on or off.
  5. The right sidebar allows the adjustment of additional parameters of different objects. When you select a particular object on a worksheet, the corresponding icon is activated at the right sidebar. Click this icon to expand the right sidebar.


To end your live edit session and save your progress, look for the ‘All changes saved’ text along the status bar then simply exit the page.


If you have any questions about the document editor, send an email to support@projectfusion.com and we’ll get back to you within 15 minutes.

What are your Feelings
Share This Article :
  • Facebook
  • Twitter
  • LinkedIn
  • Pinterest
Updated on May 16, 2022
How To Live Edit A PowerPoint Document
Solutions
  • Data Room
  • Collaborate Portal
  • Digital Courtroom
Resources
  • Videos
  • Downloads
  • Apps
  • Customers
Company
  • Blog
  • Contact
  • Ethics
  • (+44)20 7183 1245
We’re ISO27001 accredited…
We’re also fully GDPR compliant…
We’re also Cyber Essentials certified too!
We give 1% of turnover to charity!
Leave us a review!
  • 2021 OD Consultancy Ltd. All rights reserved
  • Terms
  • Privacy
  • sales@projectfusion.com
  • Projectfusion.com
Twitter
Facebook-square
Linkedin