Menu
  • About Us
  • Pricing
  • Features
SCHEDULE DEMO
Popular Search goodsyncdownload

Advanced Options

  • How To Live Edit A Spreadsheet
  • How To Live Edit A PowerPoint Document
  • Real-Time Collaboration Guide
  • How To Live Edit A Document
  • Using The Projectfusion IOS App
  • Getting Your Data Room Ready For The IOS App
  • Allowing Download Access To Files
  • Projectfusion Closing Bibles
  • Backup And Redundancy Options
  • Archiving Sites The Right Way
  • Getting A Closing Bible Or Archive Of Content
  • Making Changes To Your Billing Account Such As Changing Payment Details, Billing Address, Changing Your VAT Number, Changing Your Billing Account Password Or Cancelling A Subscription
  • Adding Another Credit Card Or Direct Debit Subscription To Your Plan
  • Setting Folder And File Permissions
  • How To Setup And Use Email Upload
  • How To Upload Files Discretely
  • Uploading Or Downloading Files With Windows Web Folders / WebDAV
  • Setting Up Expandrive/Projectfusion Desktop App
  • Uploading & Downloading Files And Folders Using A Zip File
  • How To Access And View Site Reports Using The Reporting Tool
  • Projectfusion Guide To Workflows And Tasks
  • How Do I Create And Use Workflows
  • Site Index Setup And Use
  • Data Lists
  • Bulk Add Users
  • Accepting Invites And Resetting Passwords – Managers & Admins
  • Naming Conventions And Allowed Characters
  • How To Enable Advanced Excel Viewer In Your Site
  • How To Stop All Users Downloading Files
  • How To Add An Image To The Site Dashboard
  • How To Disable Sites (Managers Only)
  • Site Creators Guide
  • How To – Deleting A Site
  • Adding Custom Watermarks To Documents
  • Setting Up Watermarks
  • Setting Up Terms And Conditions
  • Create A Site And Choose Visibility / Social Settings
  • How To Add Users Into A Site Using The Groups Interface (Admin Only)
  • How To Add Yourself Into A Site & Become A Site Manager
  • Trusted Users – For Admins Only
  • Accessing Custom Reports
  • The Audit Dashlet (Administrators)
  • How Do I Customise My Data Room Emails
  • Setting Up A Custom URL With Projectfusion
  • IE6 SSL Protocols / “POODLE” Vulnerability
  • Setting Minimum Password Strength
  • Restricting Projectfusion’s Access To Your Data Room
  • Creating And Adding Users To SITE_CREATORS Groups
  • The “ADMINISTRATORS” Group And How To Add Users To It.
  • CMIS & WebDAV Control Panel
  • Disable Customize User Dashboard
  • Document Comparison
  • How To Send A File Or Folder From Your Document Library Using Safedrop
  • How To Disable Activity Feed On A Per Site Basis
  • How To Disable Recent Activity Emails
  • Getting Changes Made To Projectfusion
  • Open Standards Support
  • Using Mobile Devices With Projectfusion
  • Excel Documents In Previewer
  • How To – Use Tags
  • How To – Upload & Download
  • How to add a video to your site dashboard
  • How to use image previewer
  • How to use Blogs
  • How To – Upload Using iOS App

Safedrop

  • Safedrop Outlook Plugin Guide
  • How To – Use Safedrop Inbox
  • Using Inbox To Receive Files
  • Upload Files That Won’t Expire So You Can Safedrop Them Over And Over Again. ‘Advanced’ Interface Guide
  • Safedrop Admin
  • Safedrop Service Guide
  • Free User Safedrop Service Guide
  • How To Use The Zylpha Safedrop App
  • How To Edit Terms Of Use, Audit Retention And ‘Remember Me’ Times And Change Your API Target Folder (Advanced)
  • How To Receive Your Safedrop
  • How To Access Safedrop From Projectfusion
  • How To – Send a Safedrop
  • How To – Track a Safedrop
  • How to – Use ESIG

Getting Started

  • Getting Started With The iOS App
  • How To – Access And Manage Q&A
  • How To – Add Users
  • Getting Started Video
  • Service Guide For Managers & Admins
  • Quick Start Manual
  • How to – Use ESIG

FAQ

  • Live-Edit Keyboard Shortcuts
  • Our Policy For Upgrading/Downgrading Plans
  • Per Site Billing Option
  • What Are – Roles And Permissions
  • What Is – Autonumbering And Indexing
  • How To – Send an email to entire data room
  • Re-Inviting Members Who Have Left A Site
  • Supported Document Types For Secureview And Preview
  • How To Customise Your Site Dashboard
  • Sites I Manage
  • How To – Search
  • The Site Activity Dashlet
  • 2FA Guide
  • Deleting & Restoring Things From The Recycle Bin
  • Changing The Logo And Theme For All Sites
  • How To – Select / Change Your Home Page
  • Supported Languages
  • How To – Login To The Data Room
  • How To – Delete Files
  • How To – Branding
  • Can I transfer folders between two sites
  • Issues accessing safedrop on Chromium Browsers
  • Q&A Notifications & FAQs
  • Home
  • help
  • Advanced Options
  • Setting Folder And File Permissions

Setting Folder And File Permissions

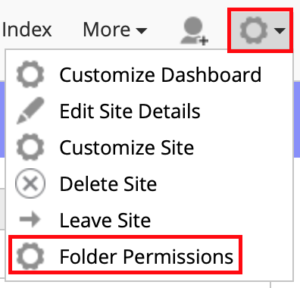
Our folder permissions module is designed to make it simple to edit access and set permissions to folders and files in a site, using a one-page overview matrix. To access the module login as a Manager of a site then click the gear icon at the top right of your site dashboard.

=== Beware of these 2 caveats ===

1) If you don’t pre-hide a folder, which will soon have documents uploaded to it, anyone that has rights to that folder will be notified that documents were uploaded to it as part of their daily email digest. Best practice is to create a folder and set No Access first via the folder permissions page, then upload documents to the folder to ensure users aren’t notified.

2) If you create new top level folders they will inherit permissions and Group A (for example) will automatically gain access. This is obvious if you’ve done lots of this before, but its not intuitive. So I recommend you go back to the Folder Permissions page after creating new top level content, to make sure the permissions are what you want to see.

Getting started

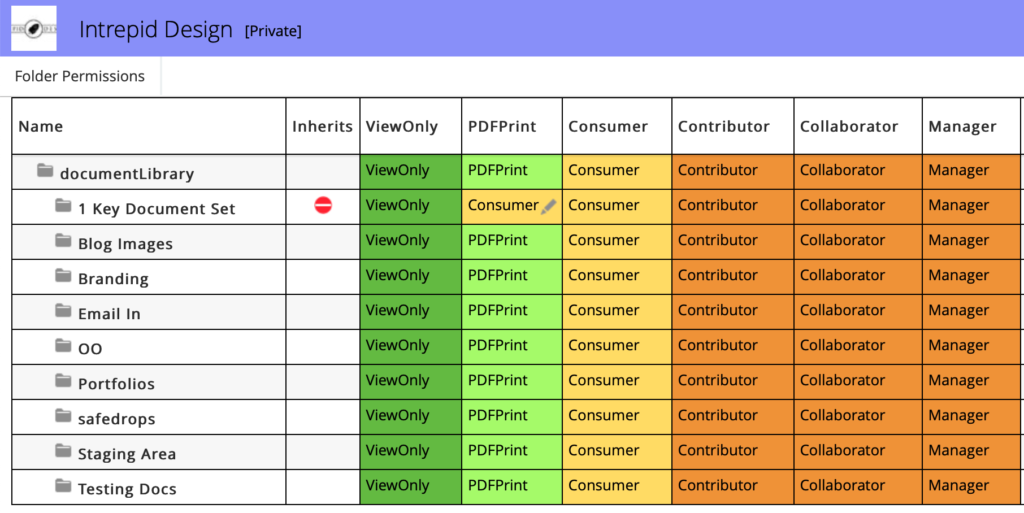
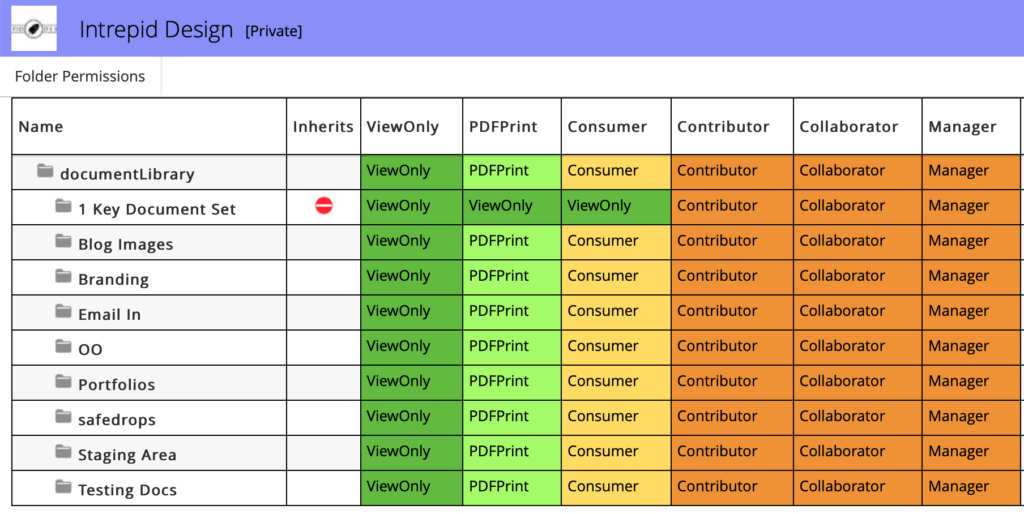
In the example below I have changed the 1 Key Document Set folder so that PDF/Print users now have Consumer level access to that folder – direct sub folders and files will inherit my changes. To make changes click a square/pencil icon in the table and select a user role from the dropdown. To undo simply click the icon in the Inherits column.

New Group – Used to create a group and multi-add users. (Optional) Add the group to Q&A.

Include Documents – Show documents in the folder permissions matrix (may cause a slow down)

Folder Depth – Choose how far down the structure you need to manage. We recommend 3.


Real use cases

We are often asked how to setup custom permission settings for a variety of use cases. Here are some examples of real use cases and how you can replicate them.

Example 1 – Restrict access to a folder

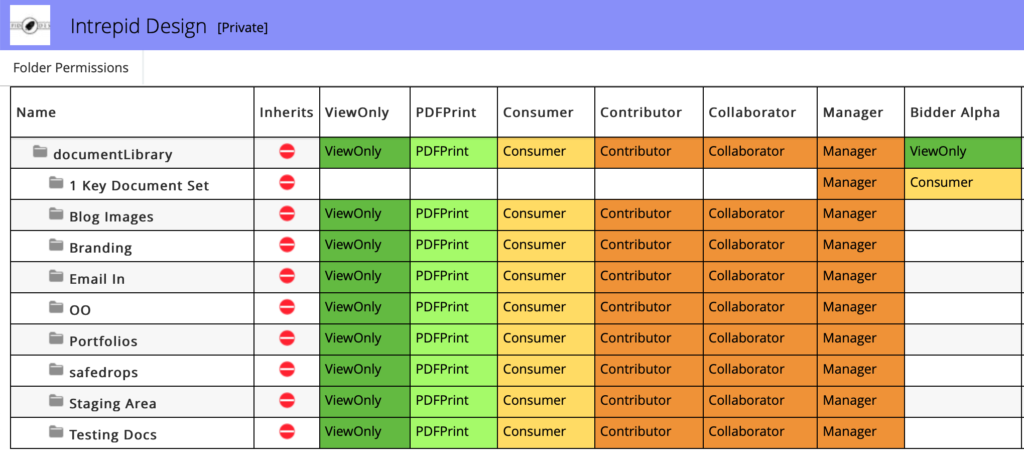
Objective: I need to hide 1 Key Document Set from non-Managers and non-Bidder Alpha group users.

  1. Click New Group, give the group a name, add users and when finished click OK.
  2. Remove unwanted access by clicking a user role along the 1 Key Document Set row and select No Access from the dropdown – repeat for each role except Manager.
  3. Click the Bidder Alpha group square along the 1 Key Document Set row and select the desired user role – I picked Consumer as an example.

Projectfusion will automatically fix any conflicts by granting View Only access to folders above in order to create a path to the folder. It will do the opposite and deny access to other folders in order to maintain document security and anonymity.


Example 2 – Increase/Decrease user role permissions to a folder or file

Objective: Edit PDF/Print and Consumer role permissions to View Only for 1 Key Document Set.

  1. Find the square along the 1 Key Document Set row and down the PDF/Print Column.
  2. Click the square/pencil icon and select View Only from the drop down.
  3. Repeat the steps above for the Consumer column and select View Only from the drop down.

PDF/Print and Consumer users can now only view documents in the 01 Key Document Set and sub folders. You can of course increase permissions for sub folders if necessary.


Example 3 – A staging folder hidden from non Manager and Staging group users

Objective: To remove complete access to our Staging Area folder for non Manager and Staging group users.

  1. Create a staging folder in the Document Library if one doesn’t exist.
  2. Go to Site Permissions and one by one remove user role access to the staging folder, which in this example is Staging Area, by selecting the square/pencil icon and click No Access from the drop down.
  3. Now create a group called Staging (or similar) and add users to the group. If you need this group to appear in the Q&A module click the tick box before clicking OK.
  4. Your group will appear to the far right of the screen. Click the square/pencil icon and set Contributor, or above, access to allow the users in this group to upload documents to the staging folder you created in step 1.

The Staging group users can now prepare documents without alerting end users. Simply collect the documents together and move them to the appropriate folder(s) in the Document Library. Many of our clients use this method to prepare documents prior to disclosing them.

We hope the improved folder permissions module will make editing permissions to folders and files a lot easier for you. We will continually improve its functionality as time goes on.

Please don’t hesitate to get in touch if you need some help.

What are your Feelings
Share This Article :
  • Facebook
  • Twitter
  • LinkedIn
  • Pinterest
Updated on May 12, 2022
Adding Another Credit Card Or Direct Debit Subscription To Your PlanHow To Setup And Use Email Upload
Solutions
  • Data Room
  • Collaborate Portal
  • Digital Courtroom
Resources
  • Videos
  • Downloads
  • Apps
  • Customers
Company
  • Blog
  • Contact
  • Ethics
  • (+44)20 7183 1245
We’re ISO27001 accredited…
We’re also fully GDPR compliant…
We’re also Cyber Essentials certified too!
We give 1% of turnover to charity!
Leave us a review!
  • 2021 OD Consultancy Ltd. All rights reserved
  • Terms
  • Privacy
  • sales@projectfusion.com
  • Projectfusion.com
Twitter
Facebook-square
Linkedin